Day 3 CI/CD: Utilize Jenkins and Docker to Deploy Your App

Passionate about expanding my skillset, focusing on Kubernetes and Golang to build robust applications and scale infrastructure.
What it's about?
In this tutorial, we will examine the process of deploying a web application on a Tomcat server within a Docker container. First, we will pull the source code from the GitHub repository and run tests on it. Afterward, the code will go through the build phase, generating artifacts. These artifacts will then be deployed on the Tomcat server, which is running as a Docker container. We will use Jenkins for automated builds and deployment, with Tomcat serving as the application server where the applications will be deployed, running inside a Docker container.
Workflow
Begin by creating two AWS EC2 instances: one for running Jenkins and the other for running Docker.
On the Jenkins server instance, install Jenkins, Maven, and JDK. On the Docker server instance, install Docker.
Set up Jenkins and configure it to work with Maven. Create a new Maven job within Jenkins. Here, Maven will act as a build tool.
Once the job is set up, Jenkins will initiate the build process.
After the build is completed, artifacts will be generated. These artifacts will need to be deployed on the Tomcat server, which will be running as a container.
Install the necessary plugins on Jenkins for deploying the application. Configure the job to utilize these plugins, allowing you to create Docker images and start a container from the image.
Integrate a GitHub webhook with Jenkins. This webhook will automate the build and deployment process, triggering the job whenever changes are pushed to the GitHub repository.
Create AWS instances
First, log in to your AWS account from this link. If you do not have an account, you can set it up using this documentation page.

After logging in, search for 'ec2' in the search box.
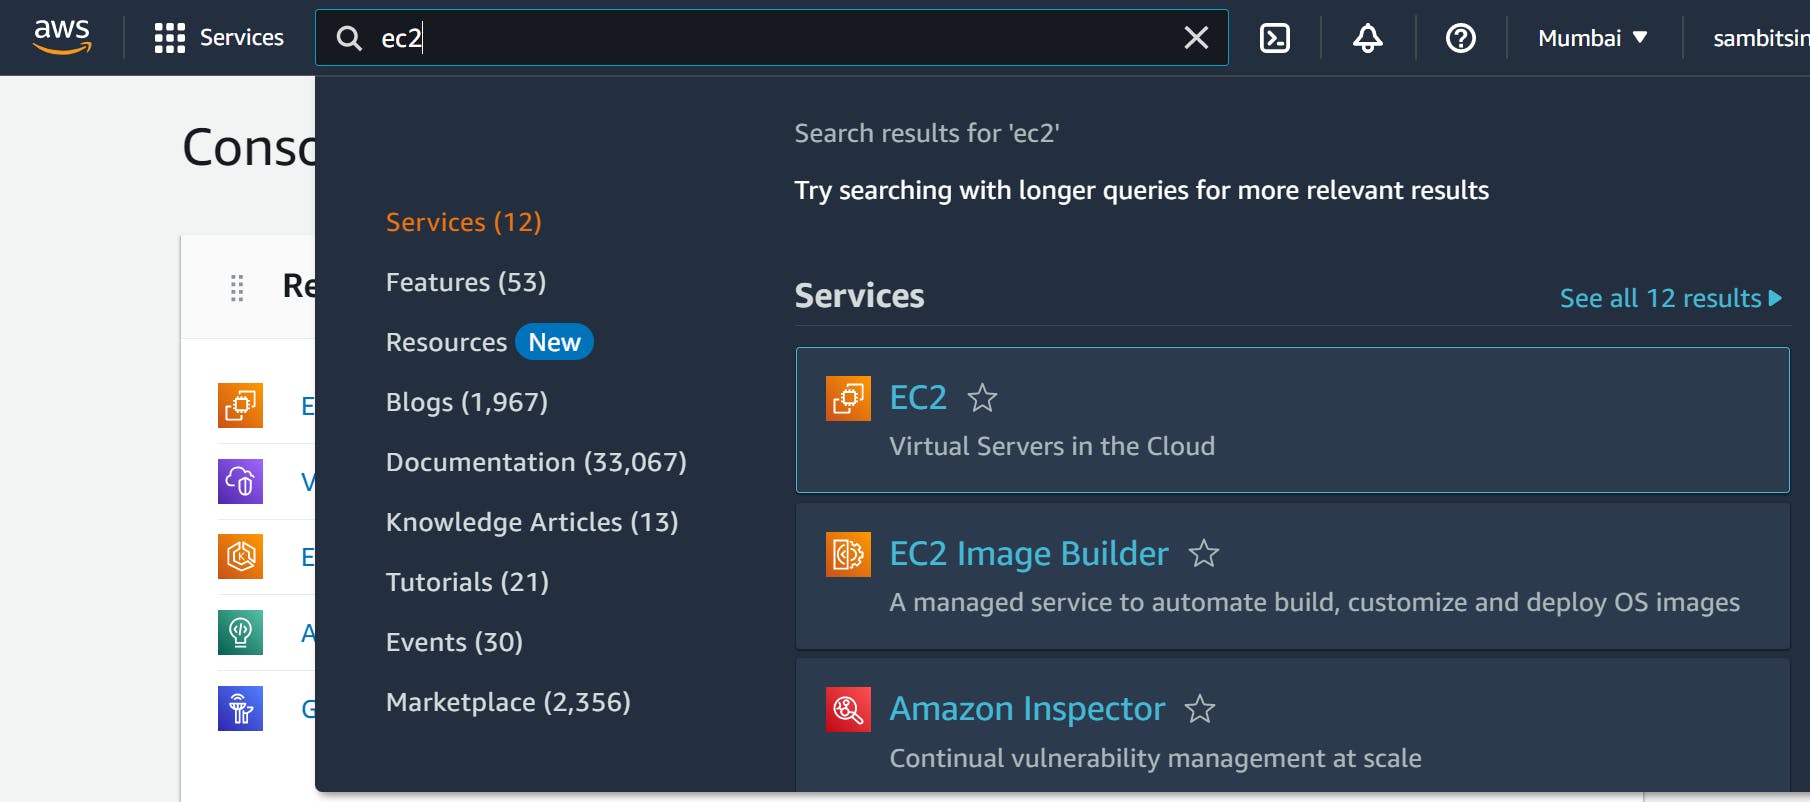
After clicking on EC2, click on instances.
Click on Launch Instances.

On the create instances page, do the following:
-> Give the name 'Jenkins - Server' in the name section.
-> Number of instances should be 1.
-> Select 'Ubuntu' from the OS images.
-> In the key-pair section, click on 'Create new key pair' and provide a name and leave everything else as default. Then click on 'Create key pair'
-> Leave everything else as default and click on 'Launch instance'
Now you have created a server to run Jenkins, Maven and JDK. Similarly, follow the above steps to create another server to run Docker and name it 'Docker - Host'. We will use 'Amazon EC2' instead of 'Ubuntu' for the Docker. Only the underlying os is changed, the rest of all things are the same.
Upon server creation, it starts in the initialization state. If you follow the above steps, our servers should be ready by now.

Enable port 8090 on the Docker server
To ensure access to the containers running on the Docker server, it's necessary to enable a port that can handle incoming requests and forward them to the appropriate container. Follow these steps to enable port 8090 on the Docker server:
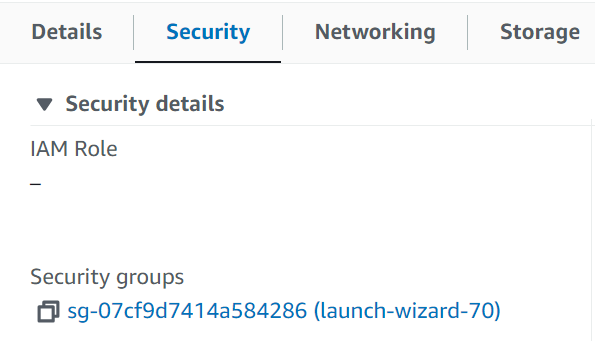
To open the port click on the 'Docker - Host' instance name, it will open up all the details for your instance.
Click on the security tab and then click on the security group name.
Click on the 'Edit inbound rules' button -> Click on the 'Add rule' button -> In the 'Port range' column enter '8090' -> Under the 'Source' column select 'Anywhere-IPv4' (By selecting this you can access this port from any IP address) -> Then click on 'Save rules' button to allow access to this port.
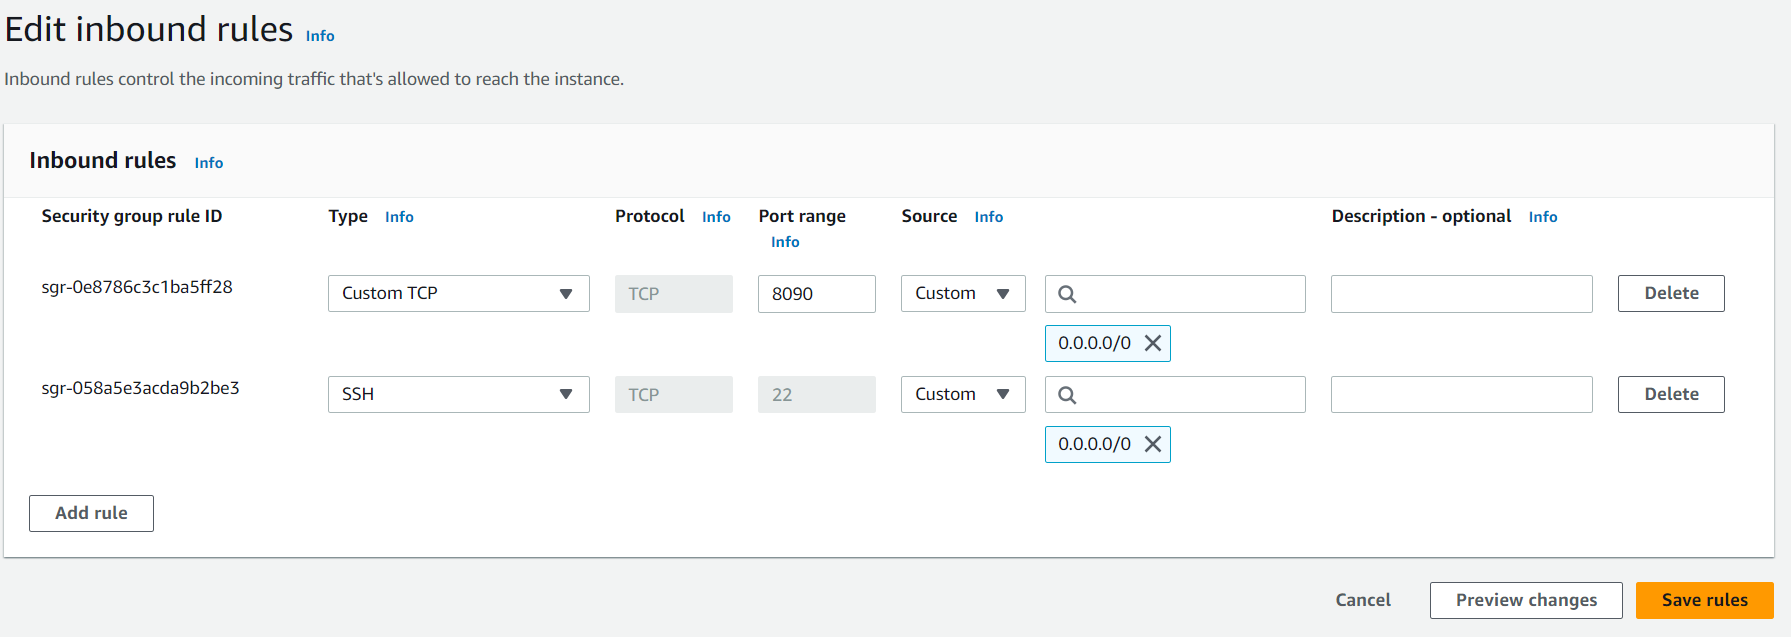
By completing these steps, you have successfully enabled port 8090 on the Docker server. This port will now be accessible, allowing you to forward requests to the containers running on the server. In the upcoming sections of the blog, we will explore how to access the application inside the containers using this port.
Copy the steps!
To configure the Jenkins server, follow the steps mentioned in each section of the blog. Here are the links to the corresponding sections:
Install Jenkins: https://sambitsinha.hashnode.dev/day-1-cicd-setting-up-and-deploying-a-java-application#heading-install-jenkins
Install Maven: https://sambitsinha.hashnode.dev/day-1-cicd-setting-up-and-deploying-a-java-application#heading-install-maven
Configure Jenkins: https://sambitsinha.hashnode.dev/day-1-cicd-setting-up-and-deploying-a-java-application#heading-configure-jenkins
Install Plugins: https://sambitsinha.hashnode.dev/day-1-cicd-setting-up-and-deploying-a-java-application#heading-install-plugins
In the 'Install Plugins' section two plugins are mentioned:
Maven Integration
GitHub
Additionally, for this project, you need to install one more plugin:
- Publish Over SSH
Follow the instructions provided in each section of the blog to configure Jenkins properly. Once you have completed the steps from all the mentioned sections, you can proceed further with the next steps of the project.
Install Docker
Log in to the Docker server by selecting the 'Docker - Host' instance from the list and clicking on 'Connect'. You will be prompted to enter a username. Leave the default settings and click 'Connect'. This will grant you access to the server through the web browser.

Once logged in, become a root user by running the following command:
sudo suInstall Docker by running the following command:
yum install dockerWhen prompted, type
Yand then pressENTERto confirm the installation.After the installation is complete, start the Docker service by running the following command:
systemctl start dockerTo check the status of the Docker service, use the following command:
systemctl status dockerThis command will display the current status of the Docker service, indicating whether it is running or not.

To verify the version of Docker that has been installed, use the following command:
docker version
Add a user for Docker Server
To add a user for the Docker server, please follow these steps:
First, become a root user by running the following command:
sudo suAdd a new user named 'dockeradmin' by running the following command:
useradd dockeradminGenerate a password for the 'dockeradmin' user by running the following command:
passwd dockeradminYou will be prompted to enter the password twice for confirmation.
Once this is done, your new user account 'dockeradmin' is set up and ready for use. You can now log in as this user using the password you established.
Note: Remember to use this password when logging into the 'Docker - Host' instance as the 'dockeradmin' user. All Docker-related tasks, such as creating images, running containers, deleting images, managing containers, and more, will be performed while logged in as the 'dockeradmin' user on the 'Docker - Host' instance.
Next, add the 'dockeradmin' user to the 'docker' group by running the following command:
usermod -aG docker dockeradmin
Create Dockerfile
To create a Dockerfile, please follow these steps:
Log into the 'Docker - Host' instance and switch to the root user by running the following command:
sudo suCreate a directory where the Dockerfile will be stored by running the following command:
mkdir /opt/docker/Change the owner of the directory to the 'dockeradmin' user by running the following command:
chown dockeradmin:dockeradmin /opt/docker/ -RThe Jenkins server will access the Docker server and will copy the artifacts to this location. All these actions will be performed on the Docker server as 'dockeradmin' user. But by default, this directory is owned the root user when first created. So, it won't allow the 'dockeradmin' user to make any changes to this folder. This is only possible if we change the directory's owner to 'dockeradmin' user.
Change to the newly created directory by running the following command:
cd /opt/dockerCreate a file named 'Dockerfile' using the vi text editor by running the following command:
vi DockerfileThis will open the Dockerfile in the vi editor.
Press 'i' to enter insert mode. Then, paste the following instructions into the file.
  # Pull base image
  FROM tomcat:8.0-alpine

  # Maintainer
  MAINTAINER "Anonymous"

  # Copy war file on to container
  COPY ./webapp.war /usr/local/tomcat/webapps

  # Expose this port on the container
  EXPOSE 8080
After pressing
ESC, type:wqand pressENTERto save and close the file.These instructions define the steps for building the Docker image.
Why was the directory created?
The directory '/opt/docker/' was created to serve as a designated location on the Docker server for storing the artifacts or files generated by the Jenkins server. In the CI/CD workflow described, after the source code is pulled from the Git repository and the necessary tests and build phases are completed, an artifact or .war file is generated. This artifact needs to be transferred from the Jenkins server to the Docker server for deployment.
The 'Publish Over SSH' plugin in Jenkins facilitates this file transfer by securely copying the artifact from the Jenkins server to the Docker server. The destination location for storing the artifact on the Docker server is the '/opt/docker/' directory that was created. Having a specific directory for storing the artifacts, provides a centralized location for the Docker server to access the necessary files for building and running the Docker containers. It also ensures that the required files are available for the subsequent steps in the CI/CD pipeline.
What is mentioned in the Dockerfile?
The Dockerfile contains the instructions for building the Docker image. Here's an explanation of each instruction mentioned in the Dockerfile:
FROM tomcat:8.0-alpine
This instruction specifies the base image that will be used for the Docker image. In this case, it uses the 'tomcat' image with the tag '8.0-alpine'. The 'alpine' tag refers to a lightweight version of the image based on Alpine Linux.
MAINTAINER "Anonymous"
This instruction specifies the maintainer of the Dockerfile. Here, it is set to 'Anonymous', but you can replace it with your name or any relevant information.
COPY ./webapp.war /usr/local/tomcat/webapps
This instruction copies the 'webapp.war' file from the current directory (where the Dockerfile is located) to the '/usr/local/tomcat/webapps' directory inside the Docker container. The 'webapp.war' file is the artifact or application file generated by the build process and is copied to this location by Jenkins.
EXPOSE 8080
This instruction exposes port 8080 of the Docker container. It allows network connections to the container's port 8080, enabling access to the application running inside the container through that port. However, this instruction alone doesn't publish the port to the host machine. To publish the port and make it accessible from outside the container, additional steps are required during container runtime.
We will see next how to do this.
Enable Password-Based Authentication
Enabling password-based authentication on the Docker server allows the Jenkins server to communicate with the Docker server using the 'dockeradmin' user credentials. Here are the steps to enable password-based authentication:
Log into the Docker server and switch to the root user using the command:
sudo suOpen the SSH configuration file in the vi editor:
vi /etc/ssh/sshd_configPress 'i' to enter insert mode and then add a comment on this field:

After pressing
ESC, type:wqand pressENTERto save and close the file.Restart the sshd service to apply the changes:
systemctl restart sshd
By making these changes, password-based authentication will be enabled on the Docker server, allowing the Jenkins server to authenticate using the 'dockeradmin' user credentials.
Add Docker Server in Jenkins
Now, we need to add the Docker server details in Jenkins. To do this, click on 'Manage Jenkins' from the Jenkins dashboard. Next, click on 'System' under the 'System Configuration' section. After that, scroll down to the 'Publish over SSH' section. In this section, we will input the necessary information about the Docker server.
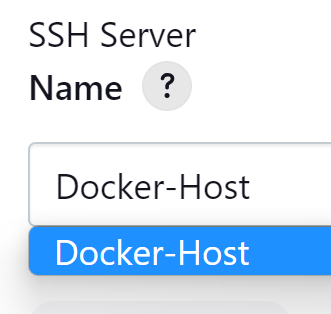
Click on 'Add' under 'SSH Servers' and then provide these details:
Name: Docker-Host
Hostname: <private-ip-of-docker-server>
Username: dockeradmin
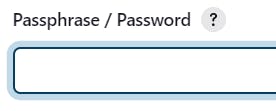
Next, click on the Advanced drop down

Ensure the 'Password Authentication' option is selected.

In the 'Passphrase/Password' section, enter the password for the 'dockeradmin' user located on the Docker server.
Click on 'Test Configuration' to verify the connection with the server. If everything functions properly, a 'Success' message will be displayed.

Click on 'Apply' and 'Save' to save the settings.
Configure Jenkins Job
We will now create a new Jenkins Job which will do all the tasks like pulling the source code from the repository, running test cases, building and copying the artifacts onto the Docker server and finally triggering the creation of the docker container.
GitHub repository URL used in the project:
https://github.com/sambit81/Hello-World-Maven.git
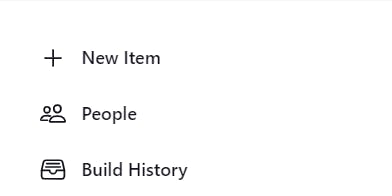
Click on 'New Item' on the Jenkins dashboard to create a new project.
Select 'Maven project' as the project type and provide 'Java-Maven-Docker' as the name.
Click on 'OK' to proceed to the project configuration page.
In the 'Configure' section of the project configuration page, you need to set up the following:
a) Source Code Management:
Select 'Git' under the Source Code Management section.
Provide the repository URL in the appropriate field.
If your repository is private and requires credentials, click on the 'Add' button next to 'Credentials' and provide the necessary credentials.
b) Build:
Specify the path to the
pom.xmlfile in the 'Root POM' field. As it is in the root directory of the project only type the name 'pom.xml' or specify the path if you change its location.In the 'Goals and options' field, enter 'clean install package' to perform a clean build, run tests, and package the JAR/WAR file.
At this point, you have created your first Jenkins pipeline. To run the pipeline and generate the JAR/WAR file:
On the Jenkins dashboard, locate your project and click on its name.
On the project page, click on 'Build Now' to start the pipeline execution.
As the execution starts, click on that process and then click on 'Console Output' to view all the live logs and steps it is performing.
Jenkins will initiate the pipeline, which will perform the specified actions, including cloning the repository, building the project, and generating the JAR/WAR file.
Once the pipeline execution is complete, you can locate the generated JAR/WAR file in the project workspace or any other specified location.
To view the file run this command:
ls /var/lib/jenkins/workspace/java-maven-cicd/webapp/target/
c) Post-Build
Now the artifacts that were generated during the build phase reside within the Jenkins server itself. We have to configure the Job so that it copies the artifact to the Docker server and executes the necessary commands to start a container.
Select the 'Java-Maven-Docker' project from the Jenkins dashboard. Then, click on 'Configure' in the left side panel.
Scroll down and click on 'Add post-build step'.

Click on 'Send files or execute commands over SSH'.

Select 'Docker-Host' from the list.
In the 'Transfer' section, make the following modifications:
Source files: webapp/target/*.war
This refers to the location on the Jenkins server where the artifact file is located after being built. Specifically, it refers to /var/lib/jenkins/workspace/Java-Maven-Docker/webapp/target/*.war (* represents any file with the .war extension).

Remove prefix: webapp/target
This generally means that the file will be copied under the mentioned remote directory. If we don't use this option the entire source file path will be created under the remote directory and then the file will be copied to that location. If we don't use the 'Remove prefix' option, then the file will get copied to this location: /opt/docker/webapp/target/*.war otherwise it will get copied to: /opt/docker/*.war

Remote directory: //opt//docker
Here we used '//' because it can't identify the single '/' character. The remote location to which the file will be copied is /opt/docker/

Exec command:
 docker stop tomcat-webapp
 docker rm -f tomcat-webapp;
 docker image rm -f tomcat-webapp-image;
 cd /opt/docker;
 docker build -t tomcat-webapp-image .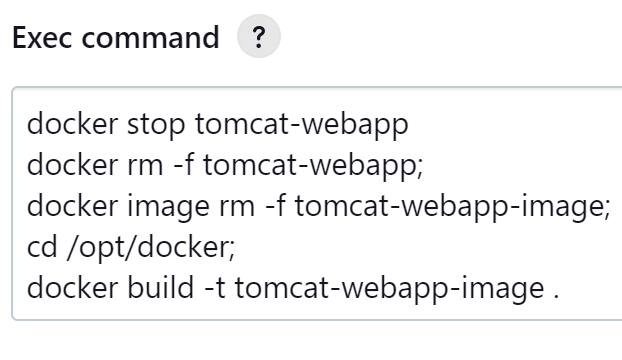
Next, we will add another task that will execute a command which will start a container from the image created from the previous post-build step. Scroll down and click on 'Add post-build step' -> 'Send files or execute commands over SSH'
Leave the other fields empty, and in the 'Exec command' field, paste this command:
docker run -d --name tomcat-webapp -p 8090:8080 tomcat-webapp-image'Apply' and 'Save' the job.
Execute it!
Before executing the Job, make sure that the Docker server is running.
To check the status of the Docker service and start it if necessary, follow these steps:
Check the status of the Docker service by running the command:
systemctl status dockerIf you see this, then the service is not running.

Start it by running the following commands:
sudo susystemctl start docker
The first command (sudo su) will switch to the root user, providing the necessary privileges to start the Docker service. The second command (systemctl start docker) will start the Docker service.
After executing these commands, the Docker service should be up and running.
Now we are ready to execute the Job. Head to the Jenkins dashboard and select the 'Java-Maven-Docker' project from the list.
Then click on the 'Build Now' option from the left side panel.

A new build will be triggered.

The build was successful.

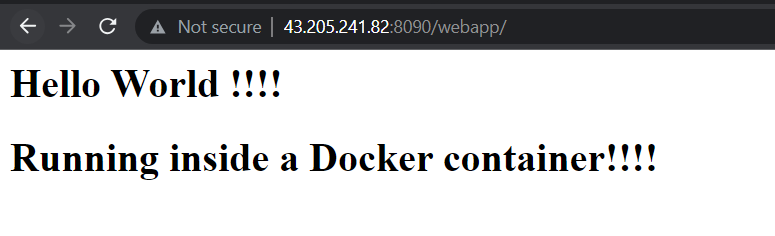
To access the Tomcat server running as a container on the Docker server, use the URL: <public-ip-of-docker-server>:8090. The port 8090 on the Docker server is mapped to port 8080 on the container, allowing you to access the Tomcat server. Any request which will hit port 8090 on the Docker server, that request will be forwarded to port 8080 on the container.

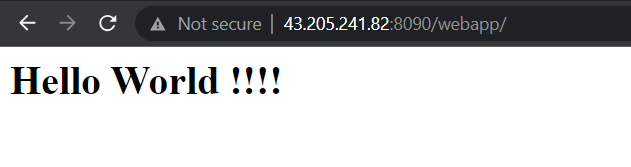
To access the application deployed on the Tomcat server, use the URL: <public-ip-of-docker-server>:8090/webapp. This URL will access the application running inside the Tomcat server container.
What happened?
Jenkins triggers a new build and pulls the source code from the Git repository.
Tests are run on the source code.
The build phase begins, where the source code is built, and artifacts are generated.
The location of the artifacts (webapp.war) in the Jenkins server can be found by running the command:
ls /var/lib/jenkins/workspace/Java-Maven-Docker/webapp/target/
The post-build phase starts, and tasks are executed.
The artifacts are copied to the Docker server.
The destination location on the Docker server is
/opt/docker/
After copying the artifact, the commands
docker stop tomcat-webapp,docker rm -f tomcat-webapp, anddocker image rm -f tomcat-webapp-imageare executed on the Docker server to ensure that any existing containers and images with the specified names are removed before starting a new container.By removing the old container and image before starting a new build, you ensure that the new container is created with the updated source code and eliminates any conflicts that may arise from running multiple containers with the same name or using outdated images.
docker stop tomcat-webapp: This command stops a running container named 'tomcat-webapp' if it exists. It gracefully stops the container, allowing it to shut down properly.docker rm -f tomcat-webapp: This command forcefully removes the container named 'tomcat-webapp' if it exists. The-foption ensures that the container is removed even if it is still running.docker image rm -f tomcat-webapp-image: This command forcefully removes the Docker image named 'tomcat-webapp-image' if it exists. The-foption ensures that the image is removed even if it is being used by other containers.cd /opt/docker-> Changes the directory to/opt/dockerdocker build -t tomcat-webapp-image .-> Uses the Dockerfile present in the current working directory (/opt/docker/) to create an image named 'tomcat-webapp-image'.The dot (
.) represents the build context. The build context is the path to the directory that contains the files and directories you want to include in the Docker image. When you execute thedocker buildcommand, Docker looks for a file calledDockerfilein the build context, which specifies the instructions for building the image.By using
.as the build context, you are indicating that the current directory is the build context. This means that Docker will include all the files and directories in the current directory when building the image. TheDockerfilein the current directory will be used as the blueprint for image creation.
To see the image created, you can run the command
docker imageson the Docker server.
The last post-build step executes a command to start a container using the image created in the previous step. The command is:
docker run -d --name tomcat-webapp -p 8090:8080 tomcat-webapp-imageThe
-doption in thedocker runcommand runs the container in detached mode, meaning it will run in the background.The
--name tomcat-webappoption assigns the name "tomcat-webapp" to the container.The
-p 8090:8080option binds the port 8090 on the Docker server to port 8080 on the running container. This allows accessing the application inside the container by accessing port 8090 on the Docker server.'tomcat-webapp-image' is the name of the image used to create the container. It refers to the image built in the previous step using the
docker buildcommand.
To see all the containers running, you can run the command
docker pson the Docker server.After the job has been executed successfully:
Access the Tomcat server container at this URL:
<public-ip-of-docker-server>:8090Access the application deployed on the Tomcat server at this URL:
<public-ip-of-docker-server>:8090/webapp
Please note that you should replace <public-ip-of-docker-server> with the actual public IP address of your Docker server.
Automate it
One way to do all the above processes is when developers upload their code to the git repository, a manual build is triggered through the Jenkins web UI. Another way is to trigger the build automatically as soon as there is any change in the git repository. This can be achieved by configuring the GitHub webhook for our project.
To configure this, follow these steps:
Select your project from the Jenkins home page and click on 'Configure'. Under 'Build Triggers' check this option. This allows Jenkins to receive notifications whenever there is a change in the repository, such as a new commit or a pull request. 'Apply' and 'Save' the project.

Now, navigate to the GitHub repository page -> Go to Settings -> Click on 'Webhooks' from the left pane -> Click on 'Add webhook' -> In the 'Payload URL' provide the URL to access Jenkins and attach '/github-webhook/' to the end of the URL.
Set the 'Content type' to 'application/json' and leave everything as default and click on 'Add webhook'. After adding the webhook refresh the page to check the connection. If the connection was successful, it would look like this:

Jenkins is configured to listen for events from the repository using a GitHub webhook. Whenever there is a change (e.g., a commit, a new branch, a pull request) in the repository, GitHub sends a webhook notification to Jenkins. Jenkins receives the webhook and automatically triggers the build process for the associated project/job. The build process starts without any manual intervention.
To see this action, we have to make some changes in the GitHub repository. Navigate to this path in the repository: (webapp/src/main/webapp/index.jsp). Now make some changes in the 'index.jsp' file and commit the changes. Now head back to Jenkins web UI and wait for a build to start. Soon, you will see that a new build will be triggered.

A new build is triggered and as usual and it passes through all the steps. During this process, stuff related to the older container is deleted and a new image is created. A new container starts running which uses the new image. After the build is completed, the new container serving the application is deployed.
Every time any change is made to the repository, it follows the same steps from deleting the old container to creating a new container.
To view the changes head to this URL: <public-ip-of-docker-server>:8090/webapp
Conclusion
In conclusion, using Jenkins and Docker for deploying web applications streamlines the CI/CD process and improves efficiency. This tutorial showed how to set up AWS instances, one for Jenkins and the other for Docker, and how to install Jenkins, Maven, JDK, and Docker on their respective instances. It also covered configuring Jenkins, creating a Dockerfile to build and deploy an application on a Tomcat server running within a Docker container. By automating the build and deployment process with GitHub webhooks, developers can concentrate on writing quality code while Jenkins and Docker handle the rest.


