Understanding Containerization: A Beginner's Guide to Docker
Unlocking the Power of Containerization: A Comprehensive Guide to Docker

Passionate about expanding my skillset, focusing on Kubernetes and Golang to build robust applications and scale infrastructure.
Issue with virtualization
With the discovery of virtualization the problem of one application - one server was solved. With virtualization, we were able to create virtual machines and servers were running multiple applications.
Now if the problem was solved then what is the need for containerization?
To understand the need let's understand a scenario. Suppose you were working on a chat application. After completing the application you have sent the application to your friend for testing. Now your friend complains that the application is not running and it is showing some errors.
There might be two cases
The app required some dependency to run which your friend's computer didn't have.
The application is running on an older version of dependencies but you have designed it using the latest version.
One way to solve the problem was to create an image of the OS on which the app was developed as the app may be using some OS files and transferring that image file to the other side. Then the other person can install the image in their environment and run the application.
But this is a very tedious task to transfer the complete image and the images will be of large sizes as the complete OS is included in it.
The best way to solve this dependency issue was to use a containerization tool like Docker.
Introduction to Docker
Docker is a containerization tool that helps to deliver software in packages called containers. Instead of a hypervisor which is used in the case of virtual machines a docker engine is installed in place of it.
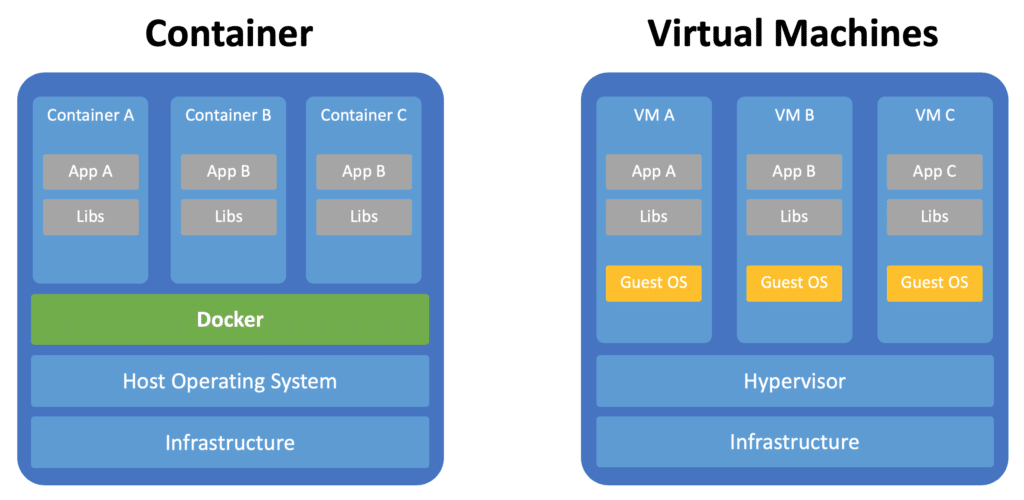
On top of the docker engine, various containers will be there inside which applications will be running. These containers contain their OS whose size is very minimal and that is the reason containers are very lightweight and easy to use. Containers share the same kernel as the host OS whereas, in the case of virtual machines, they have their kernel embedded in them. Docker helps to perform OS-level virtualization also known as containerization.
Docker Architecture
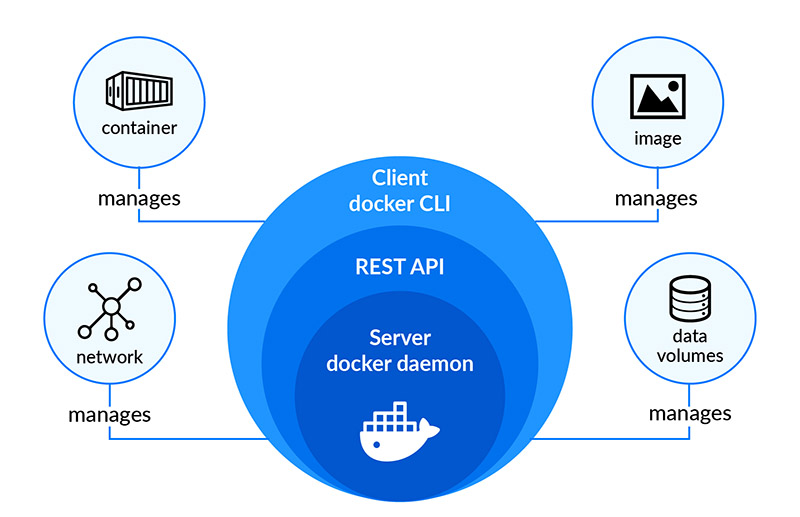
Docker uses a client-server architecture. The docker client talks to the docker daemon, which does the heavy lifting of building, running, and distributing your Docker containers. The docker client and daemon can run on the same system, or you can connect a docker client to a remote docker daemon. The docker client and daemon communicate using a REST API.
A Docker engine is referred to as a host with docker installed on it. When we install docker three things are installed on the host:
Docker CLI, Docker rest API, and Docker Daemon.
Docker daemon
The Docker daemon listens for API requests made through the docker client and manages docker objects such as images, containers, networks, and volumes. A daemon can also communicate with other daemons to manage docker services.
Docker rest API server
It is the API interface that programs can use to talk to a docker daemon and provide instructions.
Docker CLI tool
It is a command line interface that users use to perform tasks. It uses the rest API to talk to the docker daemon. Any command which you run in the docker client, the docker client, or the CLI tool sends these commands to the docker daemon, which carries them out. The docker client can communicate with more than one daemon. The CLI tool need not be on the same host and can be on a different machine.
What are control groups? -> By default, a docker container can end up using all the resources of the host. There is no limit. Docker uses cgroups or control groups to restrict the number of hardware resources allocated to each container. This can be done using the commands:
docker run --cpus=.5 ubuntu (not more than 50%)
docker run --memory=100m ubuntu
Docker registries
It is a place where docker images are stored. The images are present locally or in a remote location such as the Docker hub.
Docker images
We know that with Docker we will use containers. But how these containers are created?
Through Docker images!
A docker image is a read-only immutable file used to create a docker container. Docker images help to dockerize your application for ease of shipping and deployment. These images are stored locally or in remote locations like the Docker Hub. We can use this image to create as many containers as we want.
Steps to create a Docker image
Design all the instructions needed to run the application.
Put all these instructions inside a file named 'Dockerfile'.
Build your image:
docker build . -t repo/my-image
This will build and store the image locally.
To make it available to the public registry upload it to the public registry.
docker push repo/my-image (account/user_name/image_name)
Dockerfile
There are 3 ways to use a docker image:
Pull the image from Docker Hub.
Create from a Dockerfile.
Create images from existing docker containers.
It is a single file with all steps to create a docker image. Dockerfile is a special file that Docker can understand. Dockerfile helps to create images and those images can be used to create containers. We can compare it with a recipe needed to create a dish. We can share this Dockerfile with anyone and a Docker image can be created from it. Every step in a Dockerfile is an instruction corresponding to which some argument is provided. These Instructions instruct docker to perform a specific task when creating the image.
FROM ubuntu // Base image for container.
ENV MY_OS_NAME='Ubuntu" // Set the environment variables.
RUN /bin/bash -c 'apt update' // It will update the repositories.
RUN /bin/bash -c 'apt upgrade -y' // It will upgrade the packages.
RUN /bin/bash -c 'apt install tree -y' // It will install the tree package.
WORKDIR /home/ // It will set the working directory.
ENTRYPOINT ["sleep"] // Specifies the command instruction.
CMD ["20"] // Specifies the default value for above command instruction.
When the container starts it will sleep for 20 secs and then it will exit.
Basic commands
docker run <image-name> -> To run a container based on some image.

docker ps -> To view running containers.

docker ps -a -> To view both stopped and running containers.

docker stop <container-name>/<container-id> -> To stop a container with container id/name.

docker rm <container-name> <container-name> <container-name> -> To remove one or multiple containers.

docker rmi <image-name> <image-name> -> To remove one or more images. To remove images make sure that no container is using this particular image else it will throw error.

docker image prune -> Remove all unused images.

docker pull <image-name> -> To pull an image from registry. Eg.- Docker Hub

docker search <image-name> -> To search an image in docker hub.

docker login -u <username> -> To login into docker hub.

docker -d -> To start the docker daemon.

docker --help -> To get help with docker. Use --help on all subcommands. Eg. docker rmi --help (It will show all details of command and all the options that can be used with this command.)

docker info -> Display system wide information.

docker create <image-name> -> It will only create the container but does not starts it.

docker start  <container-name> -> To start a container.

docker attach <container-name> -> To get attached to a running container.

docker run <image-name> -> To create a container running a specific image. It will run the container in foreground.

docker run -d <image-name> -> Detached mode. It will run the container in the background. This way we will not get stuck inside container when it runs. Eg -> docker run ubuntu sleep 1500 (This will run the conatiner in foreground and will exit after 1500 sec)
But with detached mode all this will happen in background.

docker run ubuntu sleep 20 -> sleep 20 is a process. This will start the container and after 20 sec it will shut down automatically.
The above was for starting the container from scratch.

docker exec <container-name> cat /etc/hosts/*release* -> To execute a command on runnnig container. The cat command will be executed inside the container.

docker attach <id> -> To get attached to a detached container which is running in the background.

docker run -d centos sleep 20 -> If the container is exited forcefully before 20 sec then it will exit with exit code other than 0 else it will exit with exit code 0 which is in normal condition.

docker run -it centos bash -> To get attached to terminal of the container.

docker run --name <container-name> <image> -> To give specific name to container.

docker rmi <imagename:tag> <imagename:tag> -> The tag helps to differentiate between same image names.

docker inspect <container-name> -> To inspect a container.

docker logs <container name/id> -> To see logs of a container. Used for debugging.

docker exec -it <container-name/id> /bin/bash -> To go inside container and execute some commands. Type exit and press enter to come out of the container.

docker rm -vf $(docker ps -aq) -> To remove all containers and its volumes.

docker rmi -f $(docker images -aq) -> To delete all the images at once.

docker container stats -> To view the resource usage.
Docker Layered Architecture
What is it?
When docker builds the image it builds them in a layered architecture format.
Each line of instruction creates a new layer in the docker image with just the changes from the previous layer.
All the layers built are cached such that layered architecture helps you restart the docker build from the particular step in case it fails or if you want to add new steps in the build process then in all cases you won't have to start all over again.
When a particular layer fails, it uses the previous layers which were cached and tries to build the image from the currently failed layer.
The same is true when you have to add additional steps in the docker image.
This way image building is faster because you don't build all the layers again and again. This is useful when you update your app source code which changes very frequently.
Practical Example of Layered Architecture
First, check all the steps by running them manually.
Then Dockerise the application.
Create a Dockerfile and put all the instructions inside it.
Build the image from Dockerfile and don't tag a name to it.
Again, Build the image from Dockerfile and this time give it a tag.
You will see that it will not build the image from scratch and will use all the cached layers.
Docker Port Mapping
Suppose a web application is running inside a container and it is listening on port 5000. But how do you access the application on the web browser on the docker host? For that, we can use the internal IP of the container and provide the port number it is listening to. But this IP is internal and is only accessible within the docker host. But how do we access the application outside the docker host? For that, we can use the IP of the docker host. But for that to work, we need to map the port number on the container the application is listening to a free port on the docker host. This way any traffic that reaches the port number mentioned on the docker host gets forwarded to the port on the container.
docker run -p 80:5000 my-sample-webapp
Port 80 refers to the port number on the docker host and port 5000 refers to the port number on the container. This way we can run multiple instances of applications running on different ports. We cannot map the same port number on the docker host more than once.
To test it run the following command: docker run -p 5000:5000 nginx
To see the Nginx service running search this in a web browser: localhost:5000
We can map the same port of different containers to different ports on the host but the same port of the host can't be mapped to different containers.
Docker Volume Mapping
A Docker container has its volume inside it. Any changes to files and folders are stored in the volume present inside the docker container. But when the container is deleted the whole data is also deleted. If you want to persist the data you would either create a volume or map a directory inside the docker host to a directory inside the docker container.
Volume Mounting
To create a volume run this command:
docker volume create data-volume
This volume will be created inside /var/lib/docker/volumes folder. You can mount this volume to your container by running this command:
docker run -v data-volume:/var/lib/mysql mysql
If you have previously not created the volume, docker automatically creates a volume and then mounts it to the container. In volume mounting the directory is picked from the volumes folder.
Bind Mounting
If the data is already stored in some other folder other than in the volumes folder then run the command:
docker run -v /opt/datadir:/var/lib/mysql mysql
/opt/datadir refers to any directory on the docker host and /var/lib/mysql refers to a directory inside the docker container. In bind mounting the directory is picked from any location.
How to Persist data?
Run a container running Jenkins and setup it up fully.
Run another container running Jenkins it will again ask to set up everything from scratch which proves that data is not persisted.
To persist the data create a directory in the docker host and run an instance of the Jenkins container.
  mkdir my-jenkins-data
  docker run -p 8080:8080 -v /root/my-jenkins-data:/var/jenkins-home jenkins
Now again run Jenkins using another container.
docker run -p 8080:8080 -v /root/my-jenkins-data:/var/jenkins-home jenkinsNow instead of setup it will ask to log in.
This proves that data persisted inside the my-jenkins-data directory.
ENTRYPOINT vs CMD
Unlike VMs, containers are not meant to host an OS. Containers are meant to run a specific task or process such as to host an instance of the web server or application server or database or simply to carry out some level of computation or analysis task. Once the task is complete the container exits. The container only lives as long as the process inside it is alive. If the web service inside the container stops or exits, the container also exits.
To test it run the following command:
docker run ubuntu
The container will start and stop immediately.
Why?
The CMD ["bash"] instruction in the Dockerfile of ubuntu is responsible for it. Now bash is not a process like a web service. It is a shell that listens for input from a terminal, if it cannot find a terminal it exits. When we ran the ubuntu container earlier docker created a container from the ubuntu image and launched the bash program. By default, docker does not attach a terminal to a container when it is running. And so the bash program does not find the terminal and so it exits. Since the process started when the container was created, finished the container also exits as well.
The CMD instruction decides what process to run inside the container.
One way to run the command is to append the command with the run statement. That way it will override the CMD instruction mentioned in the Dockerfile.
docker run ubuntu sleep 5
It starts the container then sleeps for 5 sec and then exits. You can also mention this command inside Dockerfile so that you don't have to mention it whenever you run your container.
CMD sleep 5 / CMD ["sleep","5"] (in JSON format) (The first element in JSON must be an executable statement.)
Now, what if you only want to pass the argument and it sleeps for that many seconds?
docker run ubuntu 5
ENTRYPOINT helps in doing this. The ENTRYPOINT instruction is like the CMD instruction where you can specify the process that will run when the container starts. So whatever you pass in the argument will get attached to the command mentioned in ENTRYPOINT. In CMD instruction gets replaced entirely whereas in ENTRYPOINT it gets appended.
Mention this in (ENTRYPOINT ["sleep"]) Dockerfile and run the command (docker run ubuntu 5). The overall command that will run is (docker run ubuntu sleep 5)
If you want a default value for the argument then in that case you have to include the CMD instruction and provide the default value in JSON format in Dockerfile.
ENTRYPOINT ["sleep"]
CMD ["5"]
Then run the command: docker run ubuntu and the overall command that will run is: docker run ubuntu sleep 5
Docker Storage
When you install docker it by default creates this hierarchy.
/var/lib/docker
             |-aufs
             |-containers
             |-images
             |-volumes
All the files related to the container are stored inside the containers folder and all the files related to the volume are stored inside the volumes folder. But how exactly does docker stores the files of an image and a container? For this, we have to understand layered architecture in docker. Each instruction in Dockerfile creates a new layer in the image. These layers are cached so that they can be used further.
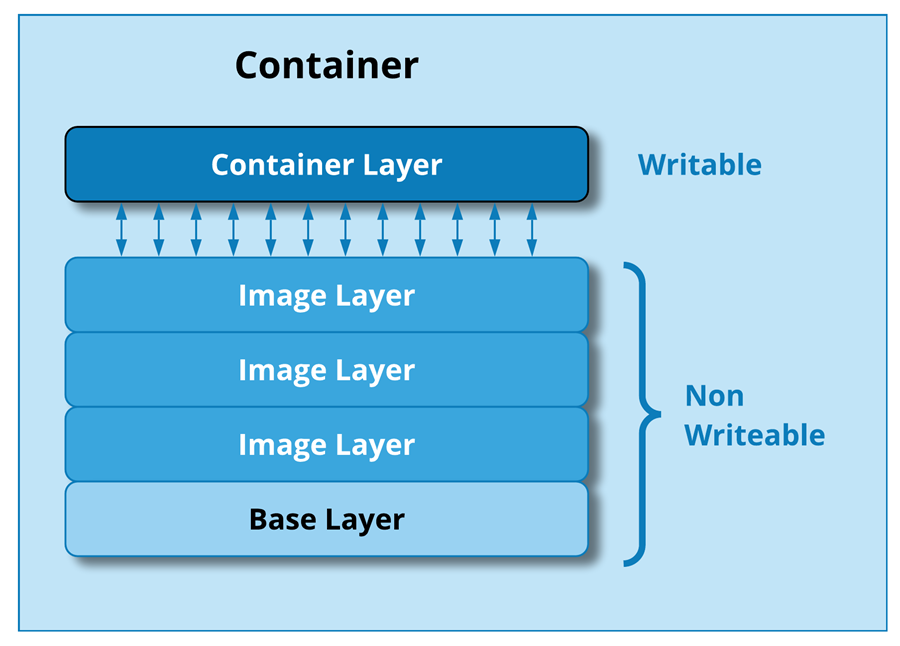
When you execute the docker build command all the layers are created and an image is formed from those layers. The image formed is read-only and its content cannot be modified. When you create a container based on this image, docker creates a new container based on these layers and creates a new writable layer on top of the image layer. This writable layer is used to store data created by containers such as log files by the applications or any temp file generated by the container or any file created by the user. The life of this layer is although is only as long as the container is alive. When the container is destroyed all the changes stored in it are also destroyed.
When you create a container based on some image docker creates a copy of all files and folders in the read/write layer. So any modification done by containers is stored in this layer and the image remains unaffected.
Docker Networking
When you install docker it installs 3 networks automatically. The bridge, none, and host. By default, any new container gets attached to the bridge network. The bridge is a private internal network created by the docker on the host. A container is attached to this network by default and gets an internal IP address.
Containers can communicate with each other from this IP. To access a container from the outside world map a port on the container to a port on the host.
Another way is to associate the container with to host network. This takes out any network isolation between the docker host and the docker container. If you run a web server on port 5000 in a container it is auto-accessible on the same port externally (on the host) without requiring any port mapping as the web container uses the host network. This would also mean that unlike before you will not be able to run multiple web containers in the same host on the same port as the ports are now common to all the containers in the host network.
In the none network containers are not attached to any network and don't have access to the external network or another container. They run in an isolated environment.
docker run ubuntu --network=none/host -> To change the default bridge network.

docker network create --driver bridge --subnet <subnet ip> <network-name> -> To create a new isolated network within the bridge network.

docker network ls -> To get list of networks.

docker inspect <container-name> -> To inspect network details of a container. Check under networks section.

docker network inspect bridge -> To inspect the bridge network.
Embedded DNS -> Containers can communicate with each other by IP address. But that is not ideal as IP can change when the container restarts. Containers can communicate with the names. Docker has a built-in DNS server that maps the IP and the names of containers. The DNS server helps the containers resolve each other by names. The DNS server always runs on address 127.0.0.11.
Conclusion
In conclusion, containerization with Docker provides an efficient and lightweight solution to application deployment and management. By using Docker, developers can overcome dependency issues, streamline the software development process, and easily create, deploy, and maintain applications in containers. Docker's architecture, layered storage, port mapping, and networking capabilities make it a powerful tool for modern software development.


