Understanding Kubernetes Architecture: A Comprehensive Guide
Deep dive into the Kubernetes components that make up the architecture


What are Container Orchestration Tools?
We know that containers are a great way to run applications as they are very lightweight and easy to use. If you want to know more about containers check my previous blog post where I discussed Docker in depth which is a popular container runtime i.e.; which helps to create and run containers. Before understanding what a container orchestration tool is let's first understand a scenario. Let's say only 2 people are using your application and those applications are running inside a container. You have manually created your containers and your customers are using them. Let's say at some time 10,000 people started using your applications will you now create 10,000 containers by yourself? No, right! Creating such amount of workload by yourself is not possible. So, that's where a container orchestration system comes into play, whose job is to automatically create and manage containers.
Suppose you have made an application that is used to stream movies. If at sudden many people start to use your application the orchestration system will automatically create containers to manage the load. As soon as the load decreases it automatically deletes those containers thus releasing the resources. You do not have to do anything here, the orchestration system will manage everything.
When a container running an application dies or gets corrupted, the orchestration system will immediately spin up another container in place, which overall reduces the downtime of your application.
What is Kubernetes (k8s)?
Think of Kubernetes as the captain of a ship that is loaded with containers.

Back in time, Google created a project called 'Borg,' which was an orchestration system to manage their huge infrastructure. While the popularity of Docker was rising, 'Borg' was already a decade old. During this time frame, the engineers at Google learned a lot about 'Borg' and its successor 'Omega.' By the time three engineers at Google, Joe Beda, Brendan Burns, and Craig McLuckie, looked at the popularity of Docker’s containers and decided to work on a project that would combine all the features of 'Borg/Omega' and Docker containers. Thus, Kubernetes was introduced.
Kubernetes is a very popular container orchestration tool that was first developed by Google and announced in mid-2014. It was later made open-source and was donated to CNCF.
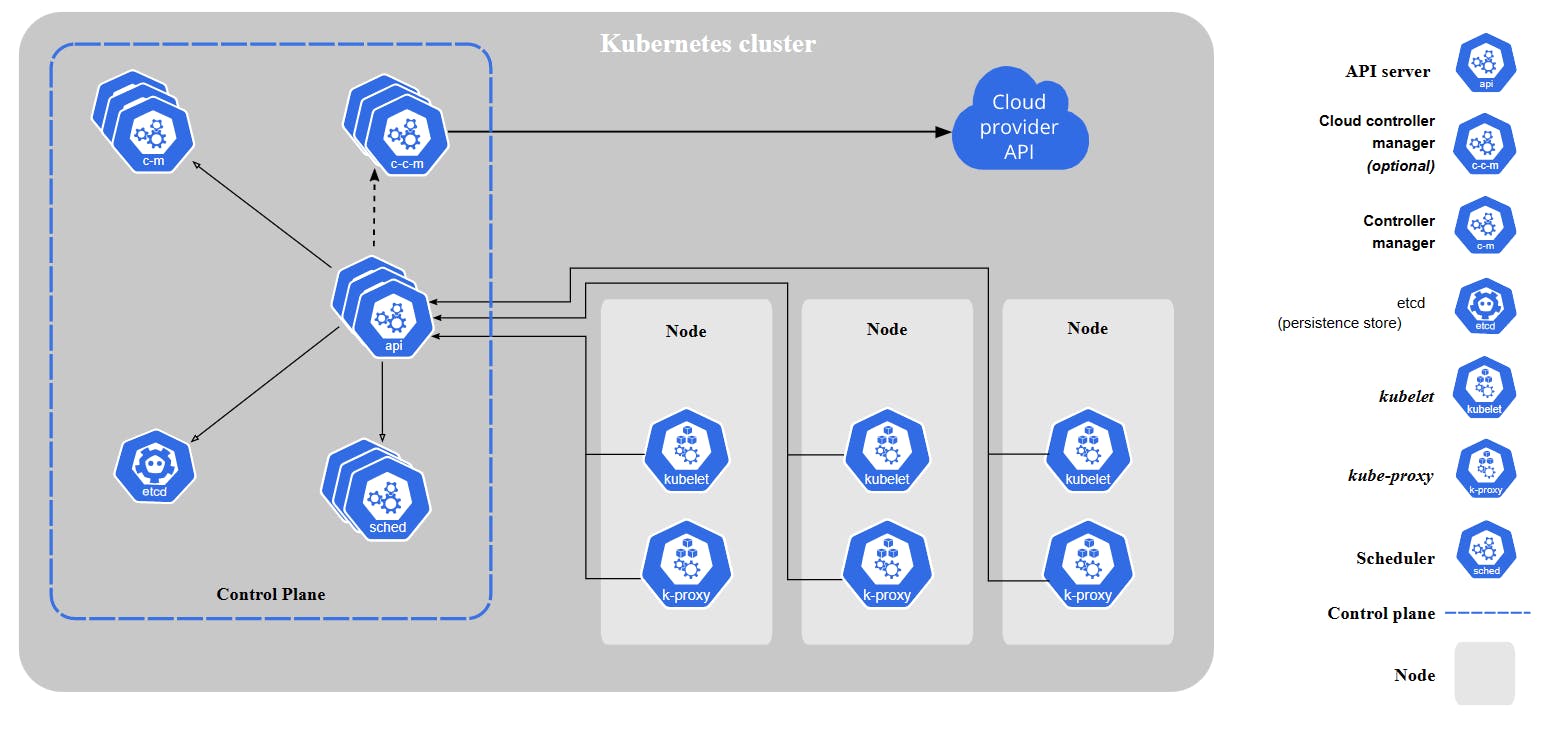
To understand Kubernetes, its internal workings and how it orchestrates containers, we have to first understand what are the various software components or programs that are present inside Kubernetes that make this magic possible. Whenever we talk about Kubernetes two most common terms come into play; Master nodes and Worker nodes. Nodes can be compared to machines or computers that run the software. We know that Kubernetes comprises various software components and these components are distributed over the master and worker nodes. We can compare the master nodes to the brain of Kubernetes where all the major software components run and the components present in these nodes decide how the orchestration of containers will happen. The worker nodes on the other hand also contain some of the Kubernetes software components and the major things that run on these nodes are workloads or containers.
Now we got the idea, that there are master nodes and worker nodes and worker nodes are managed by the master nodes. The master and worker nodes collectively form a Kubernetes Cluster.
The components present in the master node (also known as control plane components) are:
Kube API Server
ETCD
Kube Controller Manager
Kube Scheduler
Cloud Controller Manager
The components present in all the worker nodes are:
Kubelet
Kube Proxy
Container Runtime
All the components discussed above constitute the architecture of Kubernetes.
Kube API Server
The Kubernetes API server acts as a gateway to the cluster and exposes the Kubernetes API to external tools, such as kubectl and the web UI dashboard. It receives requests from these tools and other Kubernetes components, validates and processes them, and then interacts with other components to perform the requested operations.
One of its main functions is to maintain a persistent datastore using etcd, a distributed key-value store that provides a highly available and reliable way to store configuration and state information for Kubernetes objects like pods, services, and deployments.
When a request is received, the API server validates it, authorizes it, processes it, and interacts with the etcd datastore to retrieve or update the relevant information. Finally, it sends a response back to the requester.
The Role of Kube-apiserver in Pod Creation and Management:
When a Pod is created, the request is first sent to the kube-apiserver, which authenticates and validates the request. The kube-apiserver then creates a new Pod without assigning it to a node, updates the information in the etcd datastore, and sends a response to the user indicating that the Pod has been created.
The scheduler continuously monitors for newly created Pods without a node assignment and selects an appropriate node based on the Pod's resource requirements and other constraints. Once the scheduler finds a suitable node, it sends a request to the kube-apiserver to update the Pod's information with the assigned node. The kube-apiserver updates the information in the etcd datastore and forwards the request to the kubelet running on the assigned node.
The kubelet running on the assigned node detects the new Pod and creates a container with the specified image using the container runtime. The kubelet then updates the status of the Pod and its containers back to the kube-apiserver, which in turn updates the information in the etcd datastore.
ETCD
ETCD is a distributed key-value store that is responsible for storing configuration data, state information, and metadata about the Kubernetes cluster. The kube-apiserver is the only Kubernetes control plane component that communicates directly with etcd, and other components like the kube-scheduler and kube-controller-manager rely on the kube-apiserver to access data from etcd.
There are different ways to set up etcd in a cluster. One approach is to manually download the etcd binaries and configure and run them by yourself, which involves configuring networking, security, and other settings. Alternatively, you can use kubeadm to set up and manage the etcd cluster for you. In this case, etcd runs as a pod in the kube-system namespace, and kubeadm handles the deployment and configuration of the etcd cluster.
It is crucial to have a backup plan for the data stored in the etcd datastore to ensure the cluster can be restored to a known good state if the etcd cluster becomes unavailable or experiences data loss. Kubernetes provides tools for backing up and restoring etcd data, which should be used regularly to guarantee data safety.
Kube Controller Manager
The kube-controller manager is a component of the control plane that acts as a continuous control loop in a Kubernetes cluster. The controller manager monitors the current state of the cluster through the API server and changes the current state to match the desired state of the cluster.
The controller manager consists of multiple controllers, which are packed together in the kube-controller-manager daemon that helps maintain the desired state of the cluster. Logically, each controller is a separate process, but to reduce complexity, they are all compiled into a single binary and run in a single process.
Kubernetes resources are defined by a manifest file written in YAML. When the manifest is deployed, an object is created that aims to reach the desired state within the cluster. From that point, the appropriate controller watches the object and updates the cluster's existing state to match the desired state.
Multiple controllers run inside the kube-controller-manager. Each controller is responsible for monitoring its type of object. Some of the controllers are:
Node Controller: The Node Controller regularly checks the health status of nodes by communicating with the kubelet on each node. If a node fails to respond, the Node Controller marks it as unreachable and takes necessary actions such as rescheduling affected pods to other available nodes.
After waiting for 40 seconds to mark the node as unreachable, the Node Controller waits for 5 minutes for the node to come back online. If the node doesn't come online after 5 minutes, the pods are removed from that node and provisioned to healthy ones.
When a new node is added to the cluster, the Node Controller ensures that the node is correctly added to the cluster and starts monitoring it.
ReplicaSet Controller: The ReplicaSet Controller ensures that the specified number of replicas of a given pod template runs at all times. If any replica fails, the ReplicaSet Controller detects it and automatically creates a new replica to replace it based on the template specified in the ReplicaSet YAML file. This ensures that the current state of the system matches the desired state.
The ReplicaSet Controller also allows you to scale the number of replicas up or down to handle changes in traffic or workload by modifying the "replicas" field in the ReplicaSet YAML file.
Namespace Controller: The Namespace Controller helps create and manage namespaces, which divides a cluster into multiple virtual clusters with its resources. When a namespace is deleted in Kubernetes, the Namespace Controller ensures that all objects associated with that namespace are deleted. This includes pods, services, endpoints, config maps, secrets, and other resources specific to that namespace.
Kube Scheduler
The Kube scheduler is a default scheduler that runs as a part of the control plane. Its main responsibility is to assign newly created pods to nodes based on the available resources (such as CPU, memory, and storage) and scheduling requirements specified in the pod specification. The scheduler continuously watches for new pods and schedules them on appropriate nodes to ensure efficient deployment and optimal performance in a Kubernetes cluster. It is important to note that once a pod is scheduled to a node, it runs on that node until it stops or is terminated.
Some important points:
Kubernetes allows us to create our scheduler based on our needs and specification.
While the Kubernetes API lets you specify a specific node for a pod to run on, this is typically only done in special cases.
In a Kubernetes cluster, nodes that meet the scheduling requirements of pods are called feasible nodes.
If the scheduler doesn't find any suitable node for the pod then the pod remains unscheduled.
The scheduler filters out the nodes that don't meet the requirements of the pods.
The scheduler runs a set of functions on feasible nodes to score them and selects the Node with the highest score among them to run the Pod. The scheduler then notifies the API server about this decision in a process called binding.
Factors that need to be taken into account for scheduling decisions include individual and collective resource requirements, hardware and software constraints, policy constraints, affinity and anti-affinity specifications, data locality, and inter-workload interference.
How does kube-scheduler schedule pods?

Kube-scheduler selects the node for the pod in a two-step process:
Filtering
Scoring
In the filtering step, kube-scheduler identifies all the nodes that meet the pod's resource requirements, based on factors such as CPU, memory, storage, and other hardware or software constraints. This is done through a series of filters, including PodFitsResources, which checks whether a candidate node has enough available resources to meet a pod's specific resource requests. After this step, the list of nodes contains any suitable candidates, which may be one or more. If the list is empty, the pod cannot be scheduled at the moment.
In the scoring step, kube-scheduler ranks the remaining nodes based on various criteria such as data locality, inter-workload interference, affinity and anti-affinity specifications, and other scheduling requirements. The scheduler assigns a score to each node and selects the node with the highest score as the best possible node for pod placement. Once the node is selected, kube-scheduler notifies the API server of its decision in a process called binding.
Example:
In the above illustration, there are four nodes and a pod with a container that requires 10 CPUs. The first step in scheduling is filtering, where the nodes that don't meet the CPU and memory requirements of the pod are eliminated. In this case, the first two nodes are filtered out.
After filtering, the Kube Scheduler ranks the remaining nodes using a priority function that assigns a score of 0 to 10 based on various factors such as available resources, affinity and anti-affinity specifications, data locality, and more. For example, the scheduler calculates the number of resources that would be free on each node after placing the pod. In this case, the 3rd node would have 5 CPUs free, while the 4th node would have 54 CPUs free. Therefore, the 4th node gets a better rank compared to the 3rd node.
Based on the rankings, the Kube Scheduler selects the best fit for the pod placement, which in this case is the 4th node.
Kubelet
The kubelet is a critical component in the Kubernetes architecture, responsible for managing containers running on each node in a Kubernetes cluster. It works by taking instructions from the Kubernetes API server in the form of PodSpecs, which describe the desired state of a set of containers, and then ensuring that the containers described in those PodSpecs are running and healthy.
One important point to note is that the kubelet is responsible only for managing containers created by Kubernetes. If a container was created outside of Kubernetes (for example, by running a Docker command directly on the node), the kubelet will not manage it. Thus, the kubelet only manages containers that are part of the Kubernetes system.
In addition to managing containers and pods, the kubelet has a few other important responsibilities. It registers the node with the Kubernetes cluster by sending a registration request to the Kubernetes API server when it starts up. Once the node is registered, the kubelet is responsible for ensuring that the containers and pods running on the node are healthy and running as expected. To do this, the kubelet periodically checks the status of the containers and pods on the node and reports any changes or issues back to the Kubernetes API server.
When the kubelet receives instructions to load a container or pod on the node, it contacts the container runtime (e.g., Docker) to pull the required image and run an instance of it. The kubelet then monitors the container or pod to ensure that it is running correctly and reports any issues or failures back to the Kubernetes API server.
Kube Proxy
Kubernetes services provide an abstraction layer that allows applications running inside pods to be exposed to the cluster without exposing the IP addresses of individual pods. Instead, each service is assigned a stable IP address that can be used by other applications in the cluster to communicate with the pods that make up the service.
When a new service is created, kube-proxy creates a set of rules on each node in the cluster that allows traffic to be routed to the pods that make up the service. These rules ensure that incoming traffic is properly load-balanced and distributed across all the pods in the service, preventing any one pod from becoming overloaded.
kube-proxy continuously monitors the Kubernetes API server for changes to the service rules and updates the proxy and routing rules as needed. This ensures that the network connectivity and load balancing for services remains reliable and performant, even as the cluster scales up or down.
Example:
When a service is created in Kubernetes, kube-proxy creates the appropriate rules on each node to forward traffic to the backend pods. This is accomplished using IP tables rules, which are created on each node in the cluster to forward traffic heading to the IP address of the service to the IP address of the actual pod.
For example, if a service named "db" is created to expose a database application, kube-proxy will create IP tables rules on each node in the cluster to forward traffic heading to the IP address of the service (e.g. 10.96.0.12) to the IP address of the actual pod running the database application (e.g. 10.32.0.15). This allows the web application pod to access the database pod using the service name (e.g. "db"), which resolves to the IP address of the service. Learn more at this blog.
How to install:
Downloading the kube-proxy binary from the Kubernetes release page, extracting it, and running it as a service. This method involves manually downloading and installing the binary on each node in the cluster and then configuring it to run as a service.
Using kubeadm tool, which automates the deployment of kube-proxy as a pod in each node. Kubeadm deploys kube-proxy as a DaemonSet, which ensures that a single pod is deployed on each node in the cluster. This method is generally easier and more convenient, as it automates the installation and configuration of kube-proxy.
CRI (Container Runtime Interface)
CRI (Container Runtime Interface) is a plugin interface that enables the kubelet, which runs on every worker node in a Kubernetes cluster, to work with various container runtimes. Introduced in Kubernetes 1.5, CRI provides an API plugin that allows Kubernetes to use any container runtime implementing CRI to manage pods, containers, and container images without requiring recompilation.
Before CRI, container runtimes like Docker were integrated directly into the Kubernetes source code. As container technology evolved, the tight coupling of Kubernetes with a specific runtime became problematic and made it difficult to integrate new runtimes. By providing an interface that allows Kubernetes to interact with any container runtime via the kubelet, CRI enables users to use multiple container runtimes with Kubernetes.
kubectl (CLI)
Kubectl is a command-line interface (CLI) tool provided by Kubernetes that enables users to communicate with the control plane using the Kubernetes API. It is used to manage Kubernetes objects, such as pods, services, and deployments, by sending commands to the API server.
With kubectl, you can deploy applications in the cluster, inspect and manage resources, view logs, and more. The tool allows you to perform operations on multiple objects at once and provides detailed output to help you troubleshoot issues.
Kubectl also supports the use of plugins, which can be used to extend the functionality of the tool. Plugins can be used to add new commands or subcommands or to implement new features, such as custom resource types or additional authentication mechanisms.
Overall, kubectl is a powerful tool that provides developers and administrators with a flexible and efficient way to manage Kubernetes clusters.
Objects
Objects in Kubernetes are entities that represent the current state of the cluster. When you create an object you are instructing Kubernetes to bring your cluster to some desired state. Once the object is created, Kubernetes ensures that the object is present in the cluster and is working. Objects can be created by making API calls to Kubernetes API through the CLI tool (kubectl).
Most Kubernetes objects have two main fields: spec and status. The spec defines the characteristics/requirements you want for your object to have. The status field defines the current state of the object, i.e.; what are characteristics the object is currently having. Kubernetes control plane components manage the current state of the object and ensure that the current state of the object is equal to the actual state you have mentioned for the object.
How to create an object?
When you want to create an object you have to mention the spec or the characteristics and some basic information such as what kind of object you are creating (pods, deployments, services, etc) and the name of the object, etc. All this information will be provided in a file with a .yaml extension (commonly known as a YAML file). Then you have to make an API call to create this object but the API requires that the information should be provided in a JSON format. kubectl CLI tool helps in doing this. When you make a call through the CLI tool, the information in the file is converted into a JSON format and the call is made and the object is created. Again, every object has its requirement in its spec section so you have to provide that accordingly.
Example:
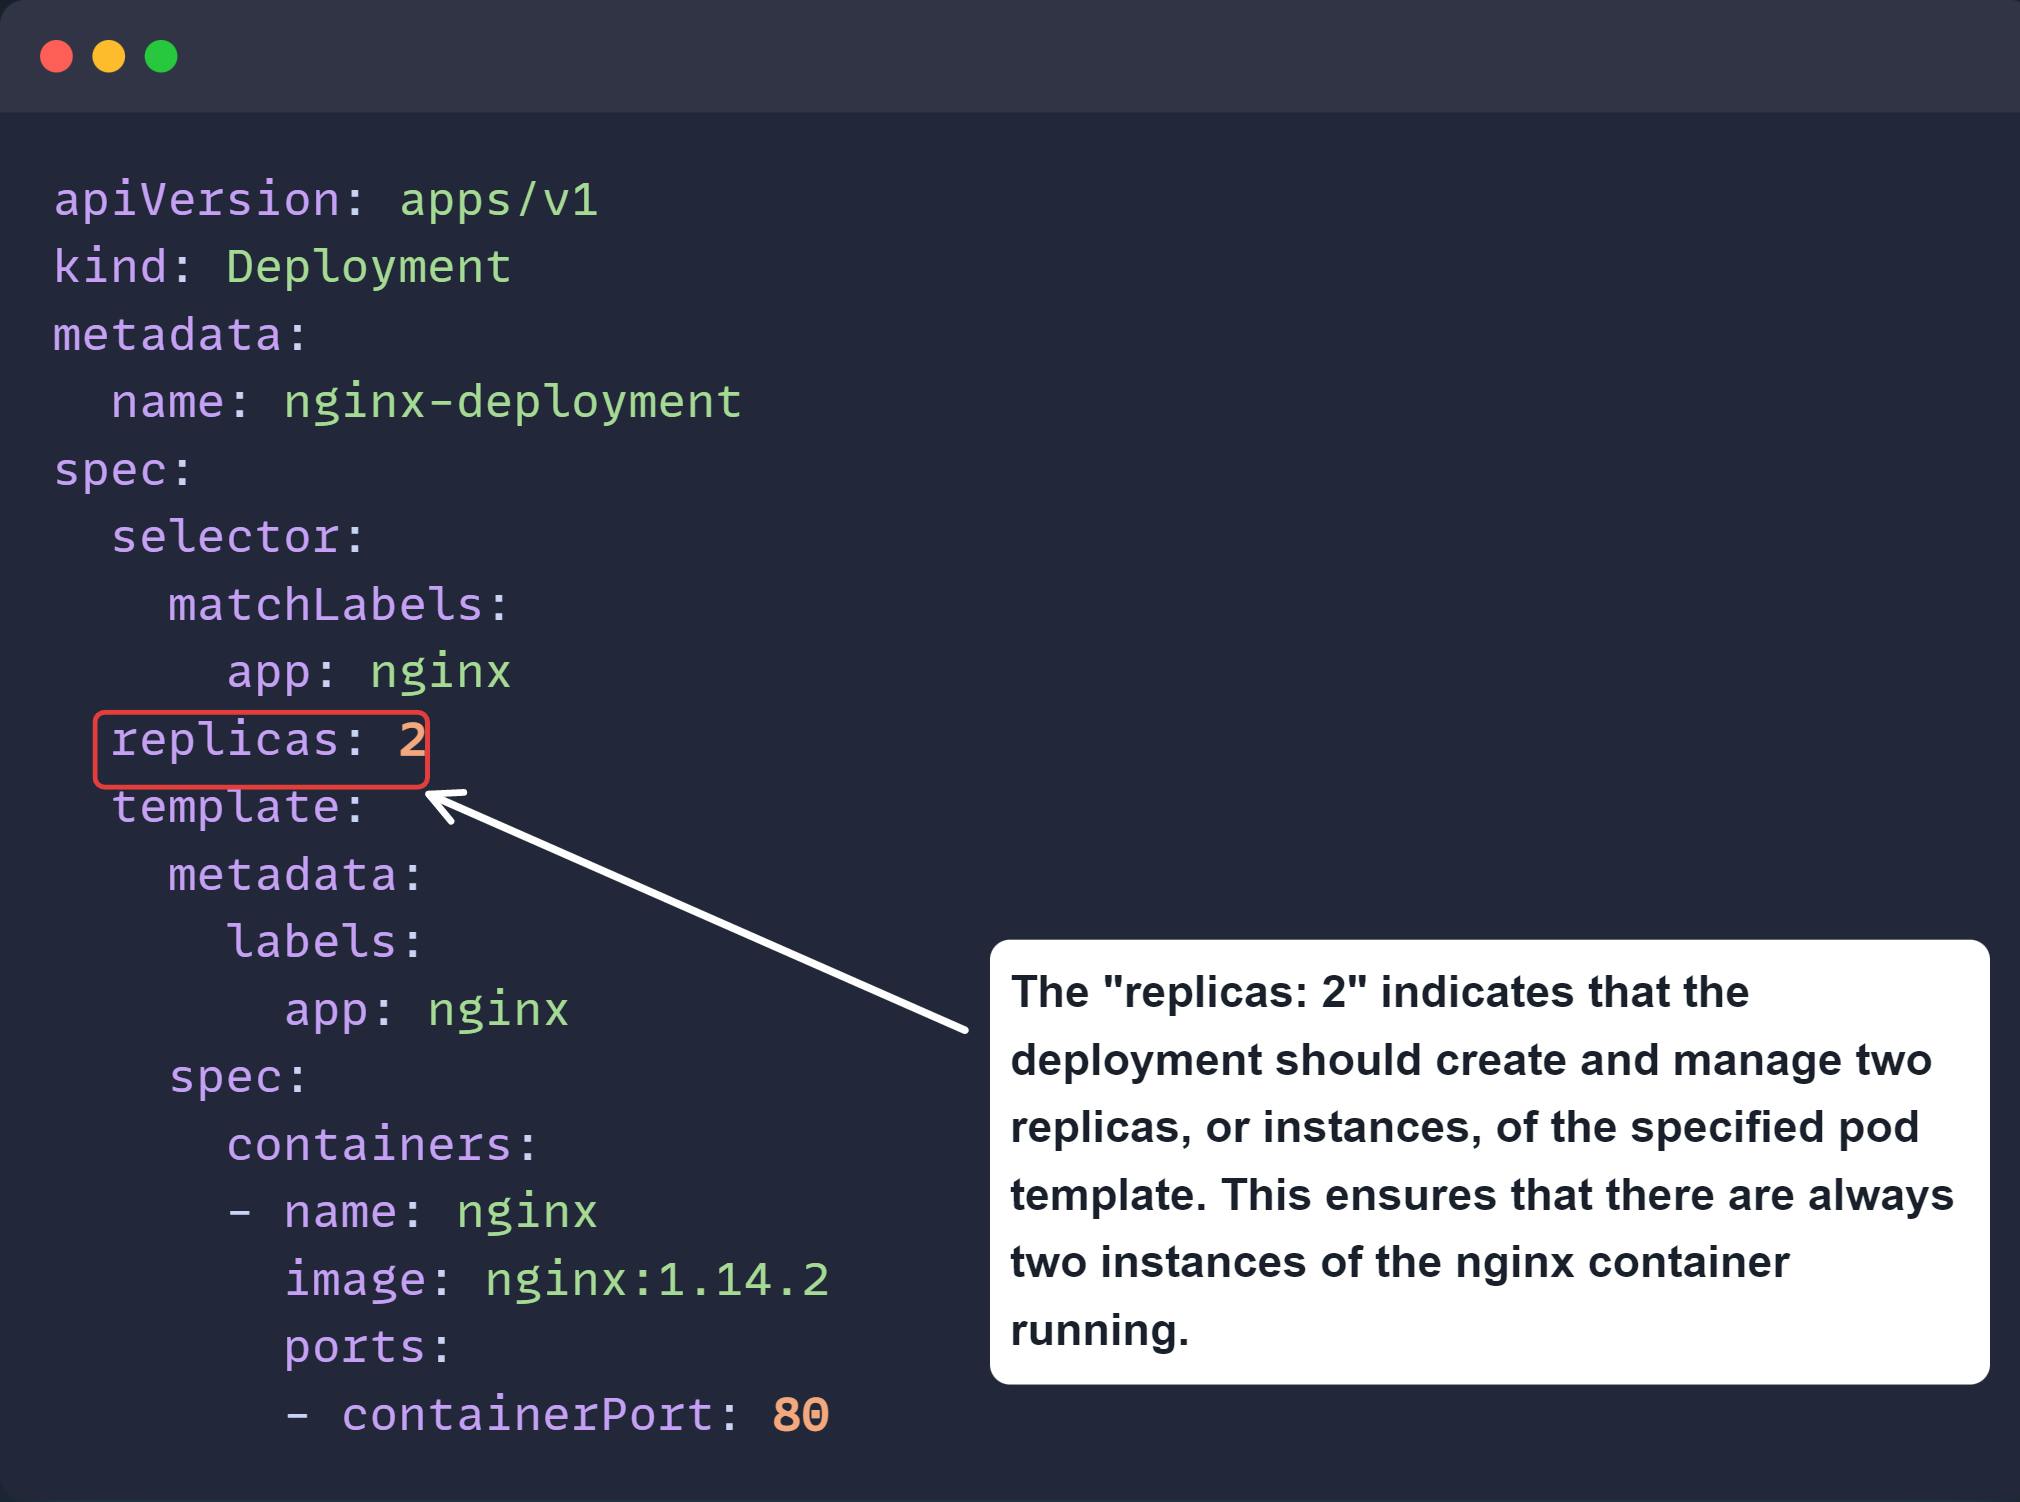
Above is an example of an object called 'Deployment'. It helps to run multiple instances of the application. Here we have provided the required fields such as 'apiVersion', 'kind', 'metadata' and 'spec'. The 'spec' section could be different for all kinds of objects available. The replicas key defined above is not required for an object called 'Pod'. The 'replicas' key here defines how many instances of our application should run all the time. Once you create the object, Kubernetes always ensures that the mentioned number of replicas should run all the time i.e.; it always tries to make the current state equal to the desired state.
To create the object run this command: kubectl create -f mydeployment.yaml
How does Kubernetes run your application? Pods!
Kubernetes manages containers by placing them inside units called "pods." A pod can contain one or more containers, and Kubernetes manages the lifecycle of the pod rather than the containers directly. This means that when the load increases on the application, Kubernetes can create multiple pods to manage the load and can delete them when the load decreases. You can think of a pod as a wrapper around a container.
Pods in Kubernetes can be used in two ways:
Single container pods: This is the most common way to use pods in Kubernetes. With single-container pods, there is only one container to deploy, scale, and monitor, which makes them simpler and easier to manage.
Examples of single-container pods include:
A pod that runs a single instance of a web application written in Node.js
A pod that runs a Redis database server.
Multi-container pods: Multi-container pods can offer more functionality as the containers can work together to achieve a common goal.
Examples of multi-container pods include:
A pod that contains a web server container and a logging container. The logging container collects the logs generated by the web server container.
A pod that contains a container that acts as a web server for files in a shared volume and a separate "sidecar" container that updates those files from a remote source, as shown in the diagram.

How to create a Pod?
There are two ways to create a pod:
Imperative way
Declarative way
To create a Pod imperatively, you can use the kubectl run command followed by the name of the Pod and the Docker image to be used. Here's an example:
kubectl create pod my-pod --image=my-image
This will create a Pod named my-pod using the Docker image my-image. You can also specify additional options like the Pod's labels, resource requests, and commands to run in the container using the --labels, --requests, and --command flags respectively.
To create a pod using a declarative way a YAML file is used. You can create a YAML file with the following contents:
apiVersion: v1
kind: Pod
metadata:
  name: my-pod
  labels:
    app: my-app
spec:
  containers:
  - name: my-container
    image: nginx
In this example, the YAML file describes a pod with a single container running the nginx web server. To create the pod, save the contents of the YAML file to a file, such as a pod.yaml, and then run the following command:
kubectl create -f pod.yaml
Running pods with controller abstraction
By default, a pod does not have self-healing capabilities. If a pod fails, gets deleted, or is evicted due to a lack of resources or node maintenance, it will not be automatically recreated. It is recommended to always create a pod with a controller as an abstraction layer over it in Kubernetes. A controller is responsible for managing the lifecycle of a pod, ensuring that the desired state of the pod is maintained. This helps in automating the management of pods, making it easier to scale and manage the application.
Benefits of using a controller:
Manage the lifecycle of the pod automatically
When a pod is created without a controller, there is no higher-level abstraction layer to manage the pod's lifecycle. This means that you would have to manually monitor and manage the pod, including making sure that it is running, restarting it if it crashes, and ensuring that it is running on a healthy node.
On the other hand, when a pod is created with a controller, it creates an abstraction layer over the pod, allowing you to manage the pod's lifecycle declaratively. With a controller, you can specify the desired state of your application, and the controller will ensure that the actual state of the application matches the desired state. For example, if a pod crashes, the controller will automatically restart it, or if a node goes down, the controller will reschedule the pod onto a healthy node. This greatly simplifies the management of your application and makes it much easier to maintain and scale over time.
Maintains the desired state of your application
The desired state of an application refers to the configuration or settings that an application should have in a specific environment or scenario. This can include things like the number of replicas or instances that the application should have, the resources that should be allocated to the application, and other settings that define how the application should function.
In Kubernetes, controllers are used to manage the desired state of the application. The controller ensures that the number of pods or replicas specified in the desired state matches the current state of the application. If there are any discrepancies, the controller automatically creates or deletes pods to bring the current state of the application in line with the desired state. By using controllers to manage the desired state of the application, it becomes easier to maintain the application and ensure that it is running as expected.
Examples of controllers: ReplicaSet, Deployment, StatefulSet, DaemonSet, Job etc.
ReplicaSet
A ReplicaSet is a Kubernetes object that ensures a set number of replicas or instances of a pod are running at all times. The desired state of the ReplicaSet is defined by the number of replicas specified in its configuration. If the actual number of replicas is less than the desired state, the ReplicaSet will create new pods to match the desired state. If there are too many pods, the ReplicaSet will delete the excess pods until the desired state is reached.
The ReplicaSet uses a pod template as input to create new pods. The template contains the definition of the pod's containers, volumes, and other metadata. Any changes made to the pod template will be reflected in the new pods created by ReplicaSet. ReplicaSets are often used to ensure that a certain number of identical pods are running in a cluster to ensure the high availability of the application.
How to use it?
Create a YAML file with the following contents:
apiVersion: apps/v1
kind: ReplicaSet
metadata:
  name: frontend
  labels:
    tier: frontend
spec:
  replicas: 3
  selector:
    matchLabels:
      tier: frontend
  template:
    metadata:
      labels:
        tier: frontend
    spec:
      containers:
      - name: redis-container
        image: redis
To create the replicaset, save the contents of the YAML file to a file, myreplicaset.yaml, and then run the following command:
kubectl create -f myreplicaset.yaml
To check the replicaset: kubectl get replicaset
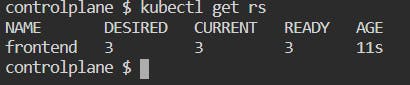
Describe the replicaset: kubectl describe replicaset frontend

See the pods created by replicaset: kubectl get pods
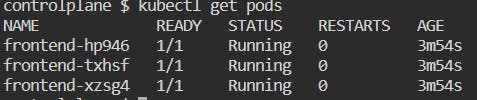
Now, these pods have been created by a replicaset. If we delete any one of the pods then the desired number of replicas (i.e.; 3) will not be equal to the current number of replicas (i.e.; 2), i.e.; the desired state will not be equal to the current set. So, replicaset will spin another pod to make the current state equal to the desired state.
Delete any one of the pods: kubectl delete pod frontend-hp946
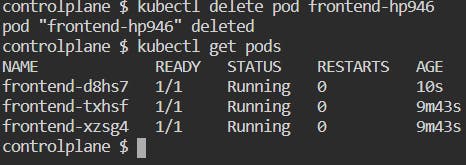
When you deleted a pod, another pod named "frontend-d8hs7" was created to match the desired state.
Pod's Lifecycle
In Kubernetes, pods are typically ephemeral (not durable), similar to containers. They are assigned a unique identifier (UID) when created and remain on a node until terminated or deleted. If the node itself is deleted, the pod is scheduled for deletion after a timeout period. Once the pod is scheduled on a node it is never rescheduled to a different node; instead, a new pod is created with the same spec but with a different UID.
Kubernetes treats the pod as the smallest deployable unit, and everything inside the pod is considered a part of that unit. When a pod is deleted, all of its associated resources are also deleted, including volumes, etc. The kubectl delete pod command can be used to delete a Pod manually. If the Pod is part of a controller (e.g. a Deployment), a new Pod will be automatically created to replace it.
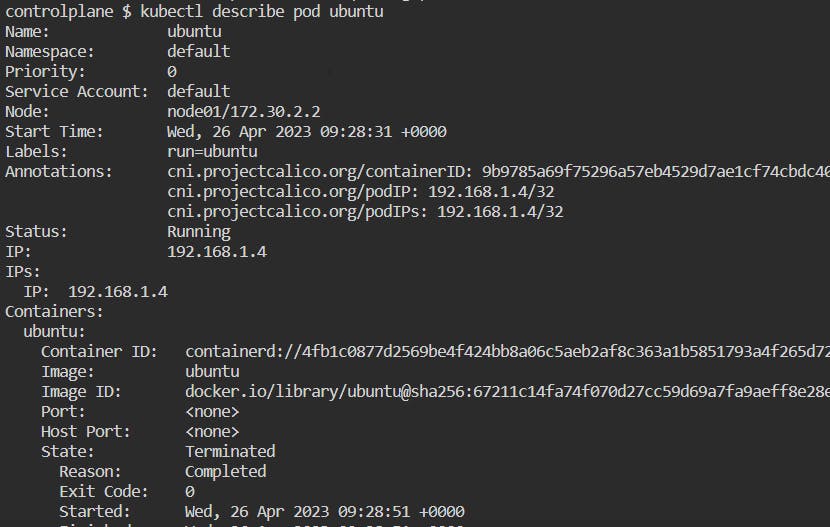
When a Pod is created, it goes through several phases: Pending, Running, Succeeded, Failed, or Unknown. These phases are reflected in the Pod's status, which can be checked using the kubectl get pods command.
Phases of pod's lifecycle
Pending: In this phase, the pod has been created in the Kubernetes cluster. The pending time includes the time it takes to schedule the pod on the node after creating it and also the time it takes to download the images for the container.
Running: The pod has been scheduled to a node and one or more containers are in starting or running phase.
Succeeded: The containers have completed their job and have been terminated successfully.
Failed: All the containers have been terminated but one or more of them have failed to terminate successfully i.e.; one or more of them have non-zero exit status or were terminated by the system.
Unknown: This happens when there is an error communicating with the node where the pod has been scheduled i.e.; the state of the pod could not be obtained.
You can check the status of a Pod's lifecycle by running the command kubectl get pods and inspecting the STATUS column.


Container States
Containers have their states that describe their current status or situation. These states help to monitor and troubleshoot the containers. There are three possible states that a container can have:
Waiting: This state indicates that the container is waiting for some other operation(s) to complete before it can start running. For example, it may be waiting for the resources to be allocated for the container to run or waiting for the image to be pulled from the registry, or waiting for some other containers or processes to complete execution.

Running: This state indicates that the container is running properly and doing its intended task.
Terminated: This state indicates that the container started executing its job and then either completed it successfully or failed due to some reason. In either case, the container has stopped running and its execution has ended. The reason for termination is usually indicated in the container's logs or can be found in the container status information.
Container Restart Policy
The restart policy determines the action to be performed when the container inside the pod terminates. It defines whether a container should be restarted automatically and under what conditions. The restart policy can be set to one of the options:
Always: This policy instructs the kubelet, to restart the container when it stops or exits. This is important to set when you run some critical applications that are needed to be accessible all the time. You can set this policy in the pod's specification section of the manifest files.
OnFailure: This policy restarts the container only if it exits with a non-zero exit code.
For example, suppose a container is running a task that retrieves data from an external API. If the API is down, the container will exit with a non-zero exit code. In this case, the
onFailurerestart policy would automatically restart the container until the API is back up and the container can complete its task.However, if the container is designed to exit with a non-zero exit code on purpose (e.g., to signal that a certain condition has been met), the
onFailurerestart policy would not be appropriate.Never: This policy never restarts the container, even if it exits with an error. Once the pod has reached the terminated state, it will remain in that state until it is restarted or deleted by the user. This policy is often used for containers that are meant to be run as one-time tasks, such as batch jobs or cron jobs, rather than long-running services.
Example:
In this example, a container has been created with a 'busybox' image. As soon as the container starts, it will run the command specified in the command field. It will print the text 'The pod is running' and will sleep for 6 seconds. After that, the pod will terminate and go into the completed phase. As the restart policy is mentioned as 'Always', it will restart the container and do the same process again and it will continue indefinitely as long as the pod is running.
apiVersion: v1
kind: Pod
metadata:
  name: mypod
spec:
  containers:
  - name: mypod-container
    image: busybox
    command: ['sh', '-c', 'echo The Pod is running && sleep 6']
  restartPolicy: Always
Conclusion
This brings us to the end of the blog. I hope you now have a clear understanding of orchestration systems and why Kubernetes is widely used. I have tried my best to explain the various components that are part of the architecture in simple, easy-to-understand language. I began by explaining what orchestration systems are. Then, I moved into the concept of master and worker nodes in Kubernetes and the components present in these nodes. After that, I explained all the components and their internal workings. I also discussed objects and pods in Kubernetes. Finally, I covered the pod's lifecycle and various container states. I hope all this information has helped you gain a foundational understanding of Kubernetes.