

Table of contents
- What it's about?
- Workflow
- Create AWS instances
- Copy the steps!
- Add User in Docker Server
- Add Docker server details
- Set up Docker Hub
- Enable Password-Based Authentication
- Add Ansible Server in Jenkins
- Create Dockerfile
- Create a playbook
- Enable password-less authentication
- What is a Pipeline?
- Configure Jenkins pipeline
- Execute it!
- What happened?
- Automate it
- Conclusion
What it's about?
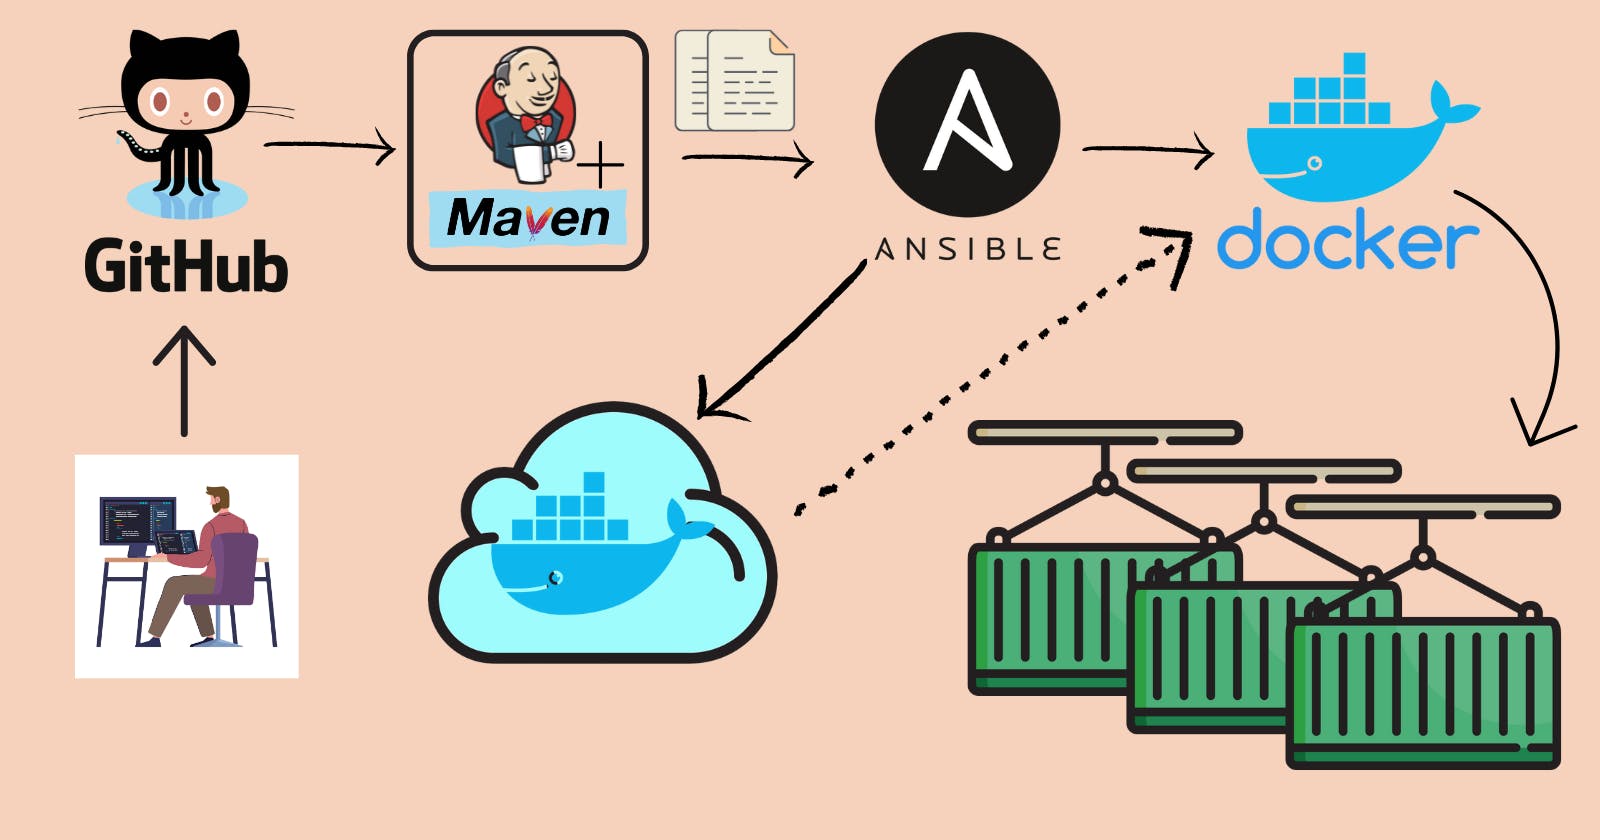
In this tutorial, we will explore the process of deploying a web application on a Tomcat server by utilizing Docker containers. Our main focus will be on building a streamlined Jenkins pipeline that seamlessly integrates with our Git repository. This pipeline will encompass various stages, including code retrieval from the repository, the build and test phases, artifact generation, and Docker image creation. The resulting image will then be uploaded to Docker Hub. Finally, we will execute the necessary commands to retrieve the image from Docker Hub and create a container instance to host our web application. By combining the power of Jenkins for automated builds and deployment with Tomcat as the application server within a Docker container, we can efficiently manage and deliver our applications.
Workflow
To begin the workflow, let's start by setting up the necessary infrastructure on AWS. Create three EC2 instances: one for Jenkins, one for Ansible, and one for Docker.
On the Jenkins server instance, install Jenkins, Maven, and JDK. This will provide the required environment for building and deploying your applications. On the Ansible server, install both Ansible and Docker. Finally, on the Docker server instance, install Docker to enable containerization.
Next, configure Jenkins to work with Maven by configuring the necessary plugins and settings. Similarly, on the Ansible server, set up Ansible and Docker. Additionally, configure Docker on the Docker server instance to enable container management.
Once the prerequisite setups are complete, install the required plugins on Jenkins and create a new Pipeline project. Use the proper declarative code within the project to define and execute your CI/CD process.
Once the job is set up, Jenkins will initiate the build process whenever triggered.
Once the build is completed, artifacts will be generated. Transfer these artifacts to the Ansible server. On the Ansible server, utilize a Dockerfile to create a docker image and upload it to Docker Hub for accessibility.
Using an Ansible playbook, execute the necessary commands on the Docker server to pull the docker image from Docker Hub and start a container.
Install the necessary plugins on Jenkins for deploying the application. Configure the job to utilize these plugins, allowing you to create Docker images and start a container from the image.
To automate the build and deployment process, integrate a GitHub webhook with Jenkins. This webhook will automatically trigger the Jenkins job whenever changes are pushed to the GitHub repository, streamlining the continuous integration and deployment process.
Create AWS instances
Log in to your AWS account using this link. If you do not have an account, you can set it up using this documentation page.

Once logged in, use the search box at the top of the page and search for 'ec2'. Click on 'EC2' from the search results to access the EC2 service dashboard.

In the EC2 dashboard, click on 'Instances'.

On the 'Instances' page, click on the 'Launch Instances' button.

On the create instances page, follow the steps below:
-> Give the instance a name such as 'Jenkins - Server' in the 'Instance name' section.
-> Set the number of instances to 1.
-> Select 'Ubuntu' from the list of available OS images.
-> In the key pair section, click on 'Create new key pair' and provide a name for the key pair. Leave all other options as default. Then click on 'Create key pair'.
-> Leave all other settings as default and click on 'Launch instance'.
Now you have created a server to run Jenkins, Maven and JDK. Repeat the above steps to create another instance for Ansible. Name this instance 'Ansible - Server' and select 'Ubuntu' as the OS image.

Similarly, create another instance for Docker and name it 'Docker - Host'. For this instance, select 'Amazon Linux' as the OS image. All other settings can remain the same.

In all three instances, the underlying os is changed, the rest of the things are the same.
Once the instances are created, they will start in the initialization state. Following the steps mentioned above, your servers should be ready by now.

Copy the steps!
Now that we have created instances for running Jenkins, Ansible, and Docker, we will proceed to install and configure the applications on these instances. I have covered these steps in my previous blog posts in this CI/CD series. Therefore, I will provide the links to the sections that are common between this blog and my previous ones. For all three instances, complete the steps mentioned in the links below:
Jenkins - Server
Install Jenkins: Follow the steps in this blog section to install Jenkins: Install Jenkins.
Install Maven: Refer to this blog section for instructions on installing Maven: Install Maven.
Configure Jenkins: Configure Jenkins by following the steps mentioned in this blog section: Configure Jenkins.
Install Plugins: Install the required plugins by referring to the following blog section: Install Plugins.
The plugins mentioned in the blog are:
Maven Integration
GitHub
Additionally, for this project, install three more plugins:
Publish Over SSH
Pipeline
Pipeline Stage View
Ansible - Server
Install Ansible: Follow the instructions in this blog section to install Ansible: Install Ansible.
Add User: Follow the instructions in this blog section to add a user: Add User.
However, please ignore the steps mentioned in the 'Tomcat - Server' subsection. The user you create here will be used by Jenkins to SSH into the Ansible server for executing commands related to container creation. We will explore this in detail later in this blog.
Install Docker: Install Docker on the Ansible server by running the following commands:
To install Docker, run this command:
sudo apt install docker.ioTo start the docker service run this command:
sudo systemctl start dockerAfter installing Docker, add the 'ansadmin' user to the 'docker' group:
sudo usermod -aG docker ansadminNote: By adding the user to the 'docker' group, you allow them to execute Docker commands without requiring root privileges. This means you won't need to use 'sudo' each time with Docker commands.
To apply the group membership changes, restart the instance. From the AWS Instances page, find the instance named 'Ansible - Server' and stop, then start it. After the restart, you can confirm that the 'ansadmin' user is now a member of the Docker group by executing the following command:
groups ansadminThis command will display a list of groups to which the user 'ansadmin' belongs, and you should see both the 'sudo' and 'docker' groups listed.
Docker - Host
- Install Docker: Follow the instructions in this blog section to install Docker on the Docker host: Install Docker.
- Enable Port: Follow the steps mentioned in the 'Enable port 8090 on the Docker server' subsection: Enable Port.
Now, we have completed all the general steps. We will now proceed with the steps that are specific to this project.
Add User in Docker Server
To add a user, execute the following command:
sudo adduser ansadminSet a password for the user 'ansadmin' to enable login with this account. Execute the following command and follow the prompts to set the password:
sudo passwd ansadminYou will be prompted to enter the password twice for confirmation. Once this is done, your new user account is set up and ready for use! You can now log in as this user, using the password you established.
To allow the 'ansadmin' user to execute commands with root privileges, add the user to the 'wheel' and 'docker' groups. The 'wheel' group automatically grants sudo access to all its members by default. Adding the user to 'docker' group allows the user to run any docker command without using 'sudo'. Run the following commands:
  sudo usermod -aG wheel ansadmin
  sudo usermod -aG docker ansadmin
Save the password of the 'ansadmin' user on the Docker server to the '/etc/password' file in the Ansible server. This step is important as the password will be used by Ansible for executing the playbooks on the Docker server.
Add Docker server details
First, we need to add the target servers to the /etc/ansible/hosts file. These are the systems on which Ansible will implement configuration changes. Ansible needs to know which systems it has to apply the configuration to. In this case, configurations refer to starting a container that serves the application, and systems refer to the Docker server.
From the AWS Instances page, locate the Ansible server and click on 'Connect' to access it.
If you are logged in as the 'ansadmin' user, log out by pressing 'CTRL + d'. Then, run the following command to switch to the root user:
sudo suOnce you are logged in as the root user, open the 'hosts' file using the vi editor by executing the following command:
vi /etc/ansible/hostsPress 'i' to enter insert mode in the vi editor. Then paste the following instructions into the file:
  [web-servers]
  <private-ip-of-docker-host>
Replace
<private-ip-of-docker-host>with the private IP address of your Docker server. This will define a group called 'web-servers' in the Ansible hosts file and specify the private IP address of the Docker server as a target server for Ansible.By adding the Docker server details to the Ansible hosts file, you have defined the target system on which Ansible will apply the configuration changes. This allows Ansible to know where it needs to start a container serving the application.
Press
ESCto exit insert mode, then type:wqand pressENTERto save and close the file.
Set up Docker Hub
We understand that the artifacts are generated on the Jenkins server and subsequently transferred to the Ansible server. The artifact is then transformed into a Docker image and uploaded to Docker Hub.
When Ansible triggers the playbook containing commands to initiate a container on the Docker server, the image is initially fetched from Docker Hub onto the Docker server, creating an instance of the image, also known as a container.
However, before uploading to Docker Hub, it is essential to grant access to the Docker Hub account on the Ansible server. This allows the docker on the Ansible server to determine the appropriate destination for uploading the images.
If you don't have a Docker Hub account, you can create one by following this link: Docker Hub Signup
If you already have an account, follow these steps to add the account to the server:
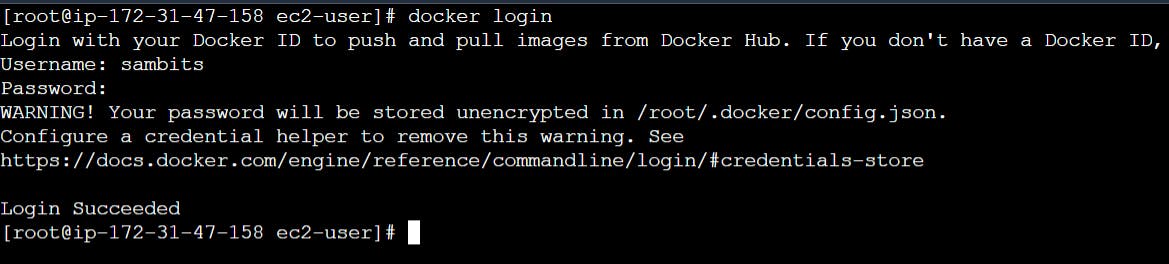
First login to the Ansible server and then switch to 'ansadmin' user:
su - ansadminRun the following command to log in to Docker Hub:
docker loginWhen prompted, enter the username and password for your Docker Hub account.
Alternatively, you can use the following command to log in to Docker Hub using a password stored in a file:
docker login --username foo --password-stdin < /etc/docker-password.txtIn this command,
/etc/docker-password.txtrepresents the file path where your Docker Hub password is stored. The<symbol is used to redirect the content of the file as input to thedocker logincommand. This approach helps to keep your password secure as it is not stored in the command history or any other visible location.
By executing the above command, you will successfully log in to your Docker Hub account. Now your Ansible server is configured to access Docker Hub for uploading Docker images.
Enable Password-Based Authentication
Here are the steps to enable password-based authentication between Jenkins and Ansible servers:
Log in to the Ansible server. If you are currently logged in as the 'ansadmin' user, log out by pressing 'CTRL + d' and then switch to the root user using the following command:
sudo suOpen the SSH configuration file using the vi editor with the following command:
vi /etc/ssh/sshd_configPress 'i' to enter insert mode and then add a comment on this field:

Press
ESCto exit insert mode, then type:wqand pressENTERto save and close the file.To apply the changes, restart the sshd service by executing the following command:
systemctl restart sshd
By following these steps, you have enabled password-based authentication on the Ansible server. This allows the Jenkins server to communicate with the Ansible server using the 'ansadmin' user credentials for authentication.
Add Ansible Server in Jenkins
Log in to your Jenkins instance and click on 'Manage Jenkins' from the Jenkins dashboard. Under the 'System Configuration' section, click on 'System'. Scroll down until you find the 'Publish over SSH' section. Click on 'Add' under 'SSH Servers' to add the Ansible server details. Provide the following information:
Name: Ansible-Server
Hostname: <private-ip-of-ansible-server>
Username: ansadmin
Click on the 'Advanced' dropdown to expand the advanced settings.

Ensure the 'Password Authentication' option is selected.

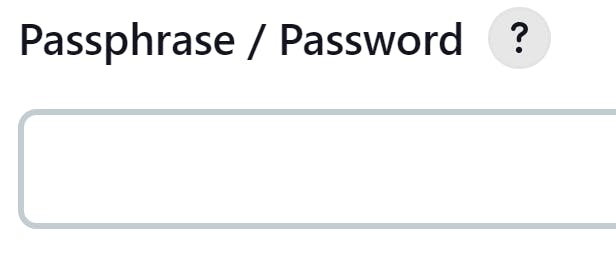
In the 'Passphrase/Password' section, enter the password for the 'ansadmin' user on the Ansible server.
Click on 'Test Configuration' to verify the connection with the server. If everything functions properly, a 'Success' message will be displayed.

Click on 'Apply' and 'Save' to save the settings.
Create Dockerfile
To create a Dockerfile, follow these steps:
Log into the 'Ansible - Server' instance and switch to the root user by executing the command:
sudo suCreate a directory to store the Dockerfile by running the following command:
mkdir /opt/docker/Change the ownership of the directory to the 'ansadmin' user with the following command:
chown ansadmin:ansadmin /opt/docker/ -RThis step ensures that the 'ansadmin' user can make changes to the folder since the Jenkins server will access the Ansible server and copy the artifacts to this location. By default, when the directory is initially created, it is owned by the root user, which doesn't allow the 'ansadmin' user to modify its contents.
Change to the newly created directory using the command:
cd /opt/dockerCreate a file named 'Dockerfile' using the vi text editor:
vi DockerfileThis command will open the Dockerfile in the vi editor.
Press 'i' to enter insert mode. Then, paste the following instructions into the file.
  # Pull base image
  FROM tomcat:8.0-alpine

  # Maintainer
  MAINTAINER "Anonymous"

  # Copy war file on to container
  COPY ./webapp.war /usr/local/tomcat/webapps

  # Expose this port on the container
  EXPOSE 8080
Press
ESCto exit insert mode, then type:wqand pressENTERto save and close the file.These instructions define the steps for building the Docker image.
Why was the directory created?
The directory was created to serve as a designated location on the Ansible server for storing the artifacts or files generated by the Jenkins server. In the CI/CD workflow, after the source code is pulled from the Git repository and necessary tests and build phases are completed, an artifact or .war file is generated. This artifact needs to be transferred from the Jenkins server to the Ansible server for further deployment.
The '/opt/docker/' directory provides a centralized location for the Ansible server to access the necessary files for executing commands to build and run the Docker containers. It ensures that the required files are available for the subsequent steps in the CI/CD pipeline.
The file transfer from the Jenkins server to the Ansible server is made possible by the 'Publish Over SSH' plugin in Jenkins. This plugin ensures secure and reliable copying of the artifact. The designated storage location for the artifact on the Ansible server is the '/opt/docker/' directory, which has been specifically created for this purpose. By having a dedicated directory for storing artifacts, the Ansible server benefits from a centralized location that provides easy access to the required files for executing commands to build and run the Docker containers. This approach guarantees the availability of the necessary files for subsequent steps in the CI/CD pipeline, thereby maintaining a smooth and efficient workflow.
What is mentioned in the Dockerfile?
The Dockerfile contains the instructions for building the Docker image. Here's an explanation of each instruction mentioned in the Dockerfile:
FROM tomcat:8.0-alpine
This instruction specifies the base image that will be used for the Docker image. In this case, it uses the 'tomcat' image with the tag '8.0-alpine'. The 'alpine' tag refers to a lightweight version of the image based on Alpine Linux.
MAINTAINER "Anonymous"
Specifies the maintainer or author of the Dockerfile. Here, it is set as 'Anonymous' You can replace it with your name or relevant information.
COPY ./webapp.war /usr/local/tomcat/webapps
Copies the 'webapp.war' file from the current directory (where the Dockerfile is located) to the '/usr/local/tomcat/webapps' directory inside the Docker container. This step adds the application artifact to the container, allowing it to be deployed and served by the Tomcat server.
EXPOSE 8080
Instructs Docker to expose port 8080 within the container. It allows network connections to the container's port 8080, which is typically the default port for Tomcat. This step does not publish the port to the host machine; additional configuration is required for that.
We will see next how to do this.
Create a playbook
To execute the necessary steps, begin by switching to the root user on the Ansible server. If you are currently logged in as the 'ansadmin' user, you can log out by pressing 'CTRL + d'. Then, switch to the root user by running the following command: sudo su
Why this playbook?
The Dockerfile is located in the /opt/docker directory on the Ansible server. This directory also contains the artifact file copied by Jenkins. Once the image is created, it will be uploaded to Docker Hub. In subsequent steps, we will explore how Jenkins executes these actions.
Completing the task of uploading the image to Docker Hub, the next objective is to download the image from Docker Hub and launch an instance of it as a container. These steps will be performed by the Ansible server on the Docker server. In a previous scenario, these actions were executed directly by Jenkins on the Docker server. However, in this case, Ansible serves as an intermediary, executing the necessary commands on the Docker server.
Since Ansible utilizes playbooks to configure target systems (in this case, the Docker server), we will create a playbook within the /opt/playbooks directory on the Ansible server. This playbook will be triggered by the Jenkins server, but its execution will be handled by Ansible. We will not manually access the Ansible server and trigger the playbook.
To create the 'playbooks' directory within the
/optdirectory, run the following command:mkdir -p /opt/playbooks/Navigate to the 'playbooks' directory and create a file named 'start_container.yaml' using the vi text editor:
  ---
  - hosts: web-servers
    become: true
    tasks:
      - name: Stop the container if it's running
        shell: docker stop netflix-webapp
        ignore_errors: yes

      - name: Remove the stopped container
        shell: docker rm -f netflix-webapp
        ignore_errors: yes

      - name: Remove the Docker images related to the container
        shell: docker image prune -a --force
        ignore_errors: yes

      - name: Start a container by pulling the image
        shell: docker run -d --name netflix-webapp -p 8090:8080 sambits/netflix
Press
ESCto exit insert mode, then type:wqand pressENTERto save and close the file.This playbook defines the execution of the playbook on the target systems listed under the 'web-servers' group. A group can contain multiple servers. All these details are mentioned in the /etc/hosts file in the Ansible server. Under 'web-servers' we have mentioned the private IP address of the Docker server.
The 'become: true' statement signifies that the playbook will be executed with root privileges on the target systems.
The 'tasks' section lists all tasks to be performed on the target systems.
This playbook includes four tasks:
Stop the container if it's running.
Remove the stopped container.
Remove the Docker images related to the container
Start a new container by pulling the latest image.
These tasks are executed using the 'shell' module, which runs shell commands on the Docker server.
Enable password-less authentication
To enable passwordless authentication between the Ansible server and the Docker server, we need to establish a secure connection without requiring manual password entry. This can be achieved by generating a public and private key pair on the Ansible server and configuring the Docker server to recognize the Ansible server as a trusted host.
First, on the Ansible server, we generate a public and private key pair using tools like ssh-keygen. This process creates the necessary files (id_rsa and id_rsa.pub) in the user's .ssh directory.
Next, we copy the public key (id_rsa.pub) from the Ansible server to the Docker server. This can be done using the ssh-copy-id command, which automatically adds the public key to the ~/.ssh/authorized_keys file on the Docker server. Alternatively, we can manually copy the contents of the public key file and append it to the authorized_keys file on the Docker server.
By copying the public key to the Docker server, we establish a trust relationship between the Ansible server and the Docker server. As a result, the Docker server recognizes the Ansible server as a known host and does not prompt for passwords when receiving commands from it.
This passwordless authentication mechanism enhances security and enables the seamless execution of Docker commands from the Ansible server on the Docker server eliminating the need for manual password entry.
To enable passwordless authentication, follow these steps on the Ansible server:
Switch to the 'ansadmin' user:
su - ansadminProvide the password if asked.
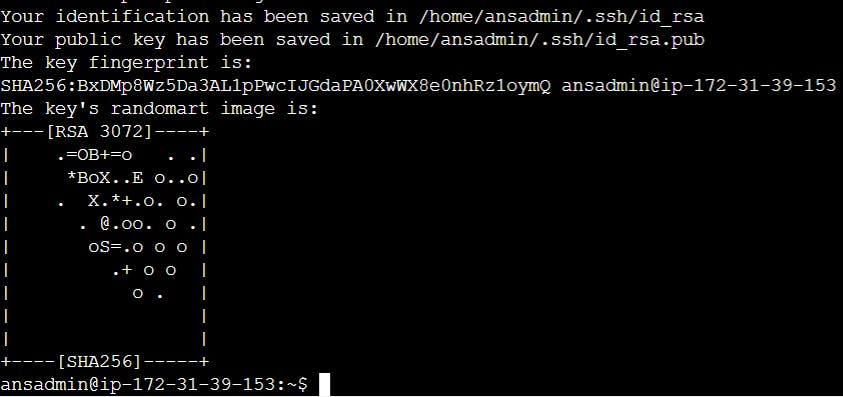
Generate an SSH key pair by executing the following command:
ssh-keygenPress
ENTERwhen:Prompted to enter the file name in which to save the key.
Prompted for a passphrase.
Prompted to enter the same passphrase again.
The public and private keys will be generated in the .ssh folder within the 'ansadmin' user's home directory.
Make sure your current working directory is '/home/ansadmin'. You can check this by running the command:
pwd
Print the public key on the terminal by running the following command and copy it to the clipboard:
cat .ssh/id_rsa.pub
Log in to the Docker server as the 'ansadmin' user:
su - ansadminProvide the password, if asked.
Make sure your current working directory is the same as below:

Paste the public key you copied into the
.ssh/authorized_keysfile. If the file doesn't exist, create it by running the following commands:mkdir .ssh touch .ssh/authorized_keysSet appropriate permissions for the
.sshfolder and theauthorized_keysfile:chmod 700 .ssh chmod 600 .ssh/authorized_keysNow we have to enable public key authentication on the Docker server.
If you are logged in as the 'ansadmin' user, log out by pressing 'CTRL + d'.
Switch to the root user:
sudo suOpen the SSH server configuration file
/etc/ssh/sshd_configusing a text editor:vi /etc/ssh/sshd_configFind the line that begins with 'PubkeyAuthentication' and set its value to 'yes'.

Press
ESCto exit insert mode, then type:wqand pressENTERto save and close the file.Restart the SSH server:
systemctl restart sshdNow, you have established passwordless authentication between the Ansible server and the Docker server.
To test the connection, on the Ansible server, switch to the 'ansadmin' user:
su - ansadminAfter that SSH into the Docker server, by running this command:ssh <private-ip-of-docker-server>Type
yeswhen prompted.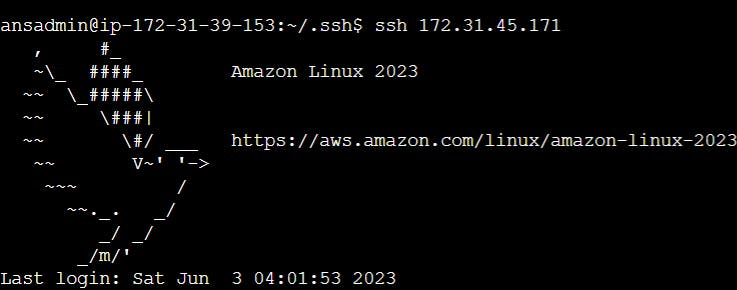
You now have passwordless access to the Docker server. To exit the server, press 'CTRL + d'.
What is a Pipeline?
In previous articles of this CI/CD series, the tasks were configured through the Jenkins UI. For example, if you wanted to pull code from a repository and run a shell command on a Linux host, you would create a freestyle project. Then, on the project configuration page, you would provide the repository URL and add a build step where you could specify the command to be executed on the system.
This approach is one way of executing tasks with Jenkins. It involves manually configuring the steps and providing input to Jenkins, including creating a job, pulling source code, adding build steps, and specifying the command to execute.
However, there is an alternative approach called 'Pipeline-as-code'. With this approach, all the above steps can be defined and written as code. Instead of interacting with the Jenkins UI, you provide the code to Jenkins, and it executes the code, performing all the tasks accordingly.
The concept of Pipeline-as-code offers significant advantages. Firstly, the code can be reviewed just like any other code in your application. It provides a centralized place to review all the steps, from pulling code from a Git repository to building and deploying the application on any application server or executing any desired command.
By adopting Pipeline-as-code, you minimize the need to extensively modify the Jenkins UI. It becomes particularly beneficial when configuring complex Jenkins projects, as the code-based approach offers greater flexibility and scalability.
How it's written?
In the given example, we have a CI/CD pipeline with multiple stages. Each stage represents a specific phase of the pipeline, such as code checkout, build, test, and deployment.
For instance:
Stage 1: Pull source code
Stage 2: Execute a command
These stages are defined within the 'stages' block. Within each stage, you can specify the steps or actions to be performed. These steps can include executing commands, running tests, or deploying the application.
The pipeline block at the beginning of the code signifies the definition of a Jenkins pipeline. Jenkins pipelines allow you to define the entire workflow of your CI/CD process as code. The pipeline is saved in a file called 'Jenkinsfile' and is written in Groovy, a scripting language.
The 'agent any' directive indicates that the pipeline can run on any available machine or node within the Jenkins environment. This flexibility allows you to distribute the workload across multiple machines or slave nodes, improving scalability and resource utilization.
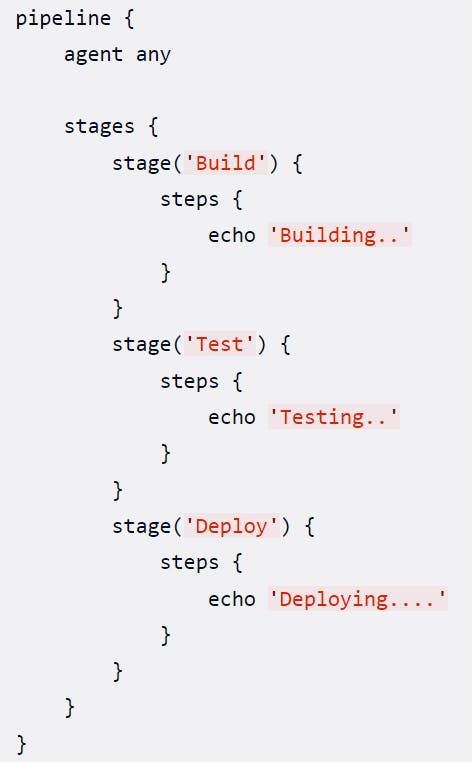
The above example can be converted to a code-like format:
pipeline {
    agent any

    stages {
        stage('Pull Souce Code') {
            steps {
                git branch: 'main', url: 'https://github.com/sambit81/Netflix-Homepage'
            }
        }
        stage('Execute a command') {
            steps {
                echo 'Hello World!'
            }
        }
    }
}
You can save the Jenkinsfile separately in the repository, or you can provide the code directly during the configuration of the Jenkins project. Jenkins provides options for defining pipelines as code, enabling version control and easier maintenance.
By using a code-like format for defining pipelines, you gain better control and reproducibility of your CI/CD process. It also enhances collaboration as the pipeline can be stored alongside your code repository, enabling teams to review, modify, and track changes easily.
What is DSL?
DSL (Domain Specific Language) is an approach used in Jenkins to define pipelines and configure Jenkins jobs using Groovy scripts. It provides a specific language tailored for defining CI/CD pipelines and automating workflows within the Jenkins environment.
There are two primary types of DSL syntax for writing Jenkins pipelines:
Declarative Pipeline
Scripted Pipeline
The choice between declarative and scripted pipelines depends on the complexity and customization requirements of your CI/CD process. Declarative pipelines are recommended for simpler workflows and ease of use, while scripted pipelines are suitable for more advanced use cases and granular control over pipeline behavior.
By using DSL in Jenkins, you can define pipelines as code, enabling version control, collaboration, and reproducibility. This approach allows teams to define and manage their CI/CD processes in a more structured and scalable manner.
Configure Jenkins pipeline
To begin, the pipeline will fetch the latest source code from our Git repository, ensuring that we have the most up-to-date version. Then test cases will be executed. Upon successful testing, the build phase will kick off, generating artifacts.
Next, the pipeline will securely transfer the artifact to the Ansible server. From there, the artifact will be uploaded to Docker Hub. With the help of Ansible, we will trigger the execution of commands on the Docker server. These commands will gracefully terminate any existing containers, fetch the desired image from Docker Hub, and ultimately start a new container from the retrieved image.
The pipeline takes charge of the entire process, seamlessly integrating source code management, testing, artifact generation, deployment, and containerization.
GitHub repository URL used in the project:
https://github.com/sambit81/Netflix-Homepage.git
Access the Jenkins dashboard and click on 'New Item' to create a new pipeline project.

Choose 'Pipeline' as the project type and enter a name for the project, 'Netflix-Pipeline'. Click 'OK' to proceed.

On the project configuration page, scroll down to the 'Pipeline' section.

There are two ways to provide the pipeline code to Jenkins:
If the code is already available on the Jenkins configuration page itself, you can directly enter it there.
If the code is stored in a file named 'Jenkinsfile' in the root directory of the application's online repository, choose the 'Pipeline script from SCM' option in the 'Definition' section and select 'Git' in the 'SCM' section.
This project follows the second approach where the code is present in a file named 'Jenkinsfile' and it is present in the project's root directory.

Select 'Pipeline script from SCM' option from the 'Definition' section.
Select 'Git' from the 'SCM' section.
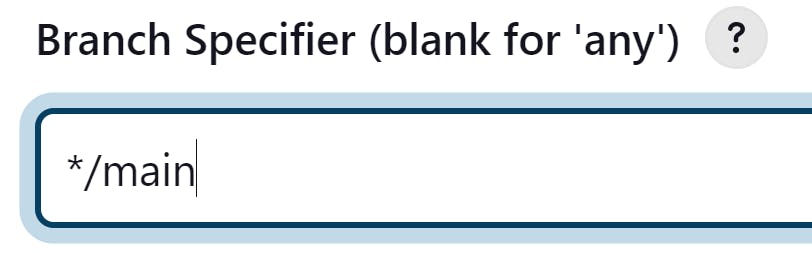
Enter the GitHub repository URL in the 'Repository URL' field.

In the 'Branches to build' section, specify 'main' as the branch to build.
Click on 'Apply' and 'Save'.
Execute it!
To ensure the successful execution of the pipeline, follow these prerequisite steps:
Check the status of the Docker service on the Docker server by running the command:
systemctl status docker. If the service is not running, proceed to the next step.You should see this if the service is not running.

Start the Docker service by running the following commands:
sudo susystemctl start docker
The first command (sudo su) will switch to the root user, providing the necessary privileges to start the Docker service. The second command (systemctl start docker) will start the Docker service.
After executing these commands, the Docker service should be up and running.
Now we are ready to execute the pipeline. Head to the Jenkins dashboard and click on the 'Netflix-Pipeline' project from the list.
Then click on the 'Build Now' option from the left side panel.

A new build will be triggered.

The build was successful.

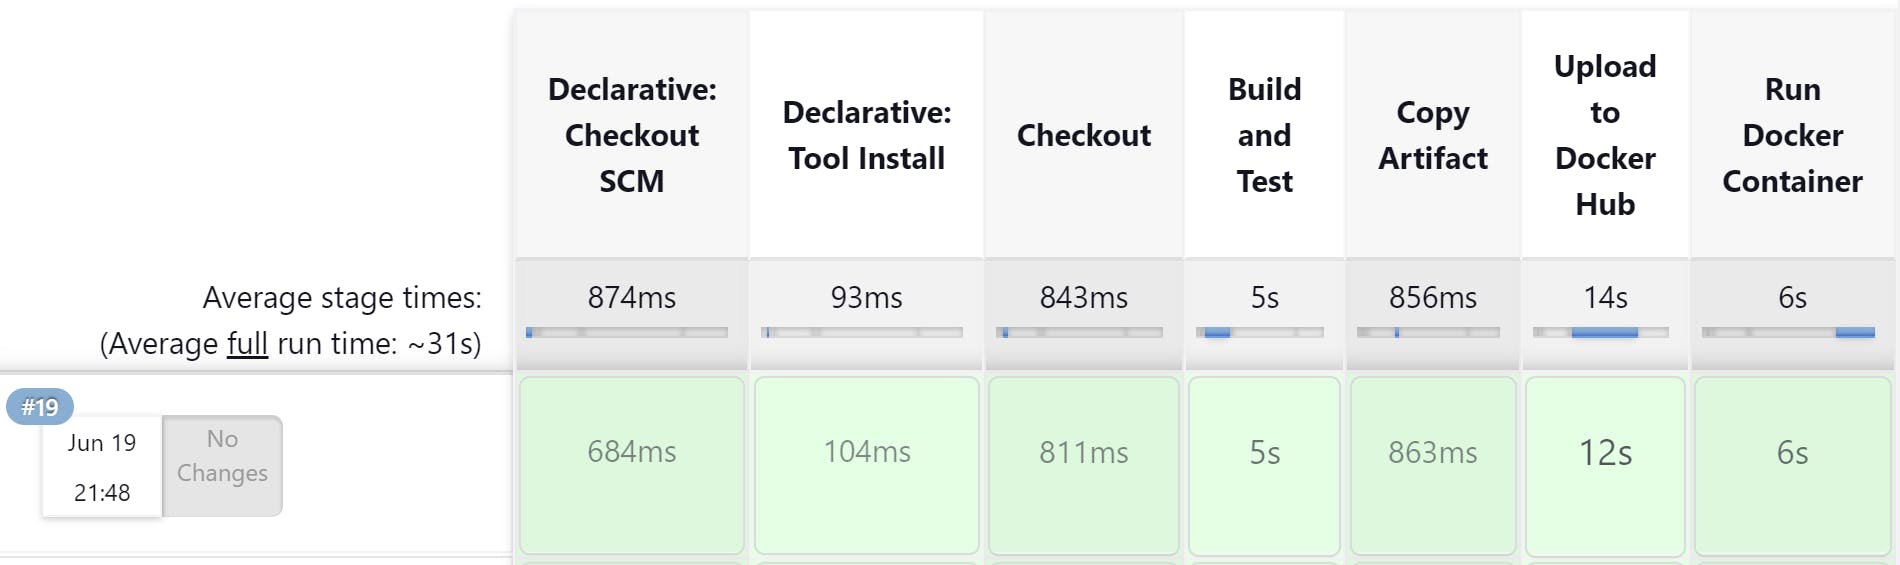
A new build will be triggered, and the pipeline will progress through various stages such as code pulling, build and test phases, and more. You can track the progress of the build using the 'Stage View' plugin installed earlier.
In this visual, you can see the average time a particular stage takes to complete and the actual time it has taken to complete the current build.
To access the Tomcat server running as a container on the Docker server, use the URL: <public-ip-of-docker-server>:8090. The port 8090 on the Docker server is mapped to port 8080 on the container, allowing you to access the Tomcat server. Any request which will hit port 8090 on the Docker server, that request will be forwarded to port 8080 on the container.
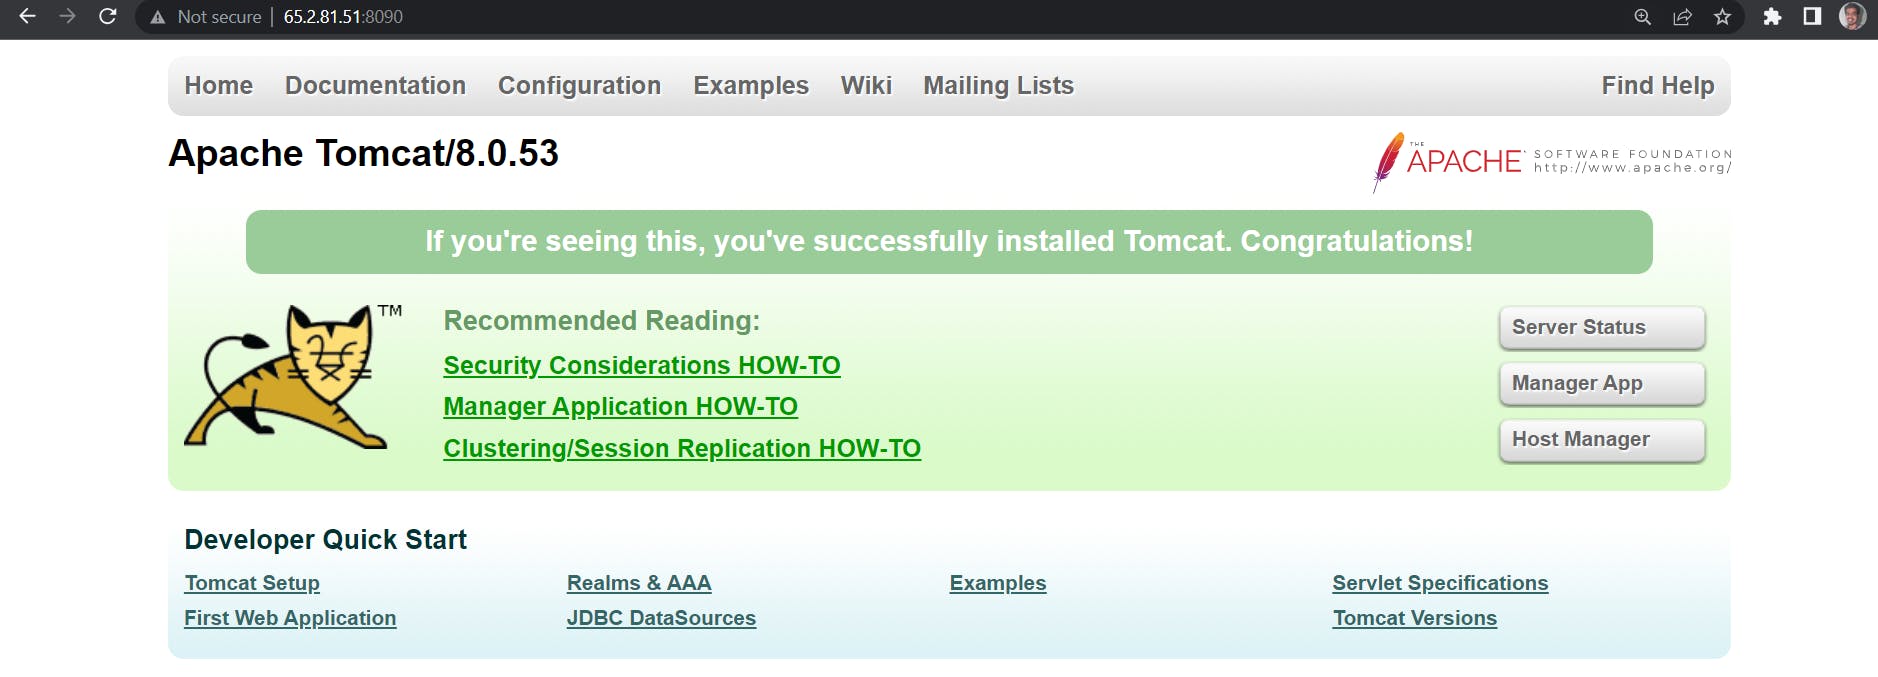
To access the application deployed on the Tomcat server, use the URL: <public-ip-of-docker-server>:8090/webapp. This URL will access the application running inside the Tomcat server container.

To view the pipeline execution and access the deployed application, please refer to the following video links:
Video link for pipeline execution: vimeo.com/837655584?share=copy
Video link for accessing the deployed application: vimeo.com/837655501?share=copy
What happened?
Link to Jenkinsfile:
https://github.com/sambit81/Netflix-Homepage/blob/main/Jenkinsfile
In this project, instead of configuring each step through the Jenkins UI, all the required steps are organized into stages within a single file called Jenkinsfile. The Jenkinsfile contains the pipeline configuration and is written in code format. The project is divided into five stages:
Checkout
Build and Test
Copy Artifact
Upload to Docker Hub
Run Docker Container
When you trigger a new build in Jenkins, all the steps specified in each stage of the Jenkinsfile are executed sequentially, automating the entire process. This approach provides a more streamlined and manageable way to configure the CI/CD pipeline.
Checkout Stage
The Checkout stage in the Jenkins pipeline is responsible for pulling the source code from the Git repository. In the provided Jenkinsfile, it is set to check out the main branch of the repository.
During this stage, the pipeline retrieves the latest version of the source code from the specified repository. This ensures that the subsequent stages of the pipeline operate on the most up-to-date code.
Build and Test Stage
In the Build and Test stage of the Jenkins pipeline, the source code undergoes testing, and once the tests pass, the build phase begins. During the build phase, the source code is compiled, dependencies are resolved, and the application is packaged into a single file, commonly known as an artifact.
In the provided pipeline configuration, the artifact generated is named 'webapp.war'. This artifact represents the packaged application ready for deployment.
After the build phase is completed, the artifact is available within the Jenkins server itself. The location of the artifact can be found by running the command ls /var/lib/jenkins/workspace/Netflix-Pipeline/target/ on the Jenkins server.

Copy Artifact Stage
In the Copy Artifact stage of the Jenkins pipeline, the artifacts that reside within the Jenkins server are transferred to the Ansible server for further deployment. This step is accomplished using the 'Publish Over SSH' plugin, which facilitates the secure transfer of files between the Jenkins and Ansible servers.
In the previous blog, this step was performed through the Jenkins UI by selecting the 'Send files or execute commands over SSH' option from the 'Add post-build step' dropdown and providing the necessary details such as source files, remote directory, etc.
In the current pipeline configuration, the equivalent code is provided to achieve the same result:
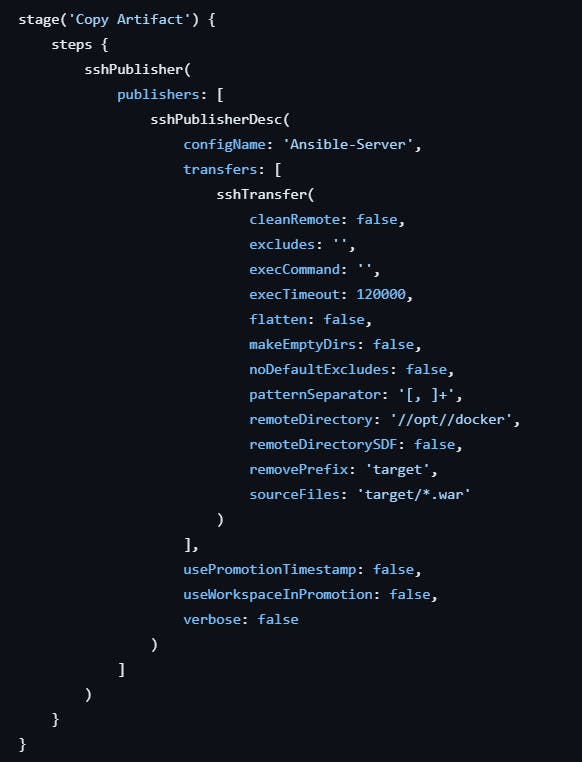
Necessary code for this project:
sourceFiles: 'target/*.war', removePrefix: 'target', remoteDirectory: '//opt//docker', configName: 'Ansible-Server'
This code specifies that the .war file located in the target directory should be transferred to the /opt/docker directory on the Ansible server. The removePrefix parameter ensures that the directory structure is maintained during the transfer.
The extra code here is the different configuration which can be also modified and is also available when we try to perform all this through the UI.
How the code is generated?
To generate the code for the artifact transfer step using the 'Publish Over SSH' plugin, follow these steps:
Select the 'Netflix-Pipeline' project from the Jenkins UI.
Click on the 'Pipeline Syntax' option from the left side panel.

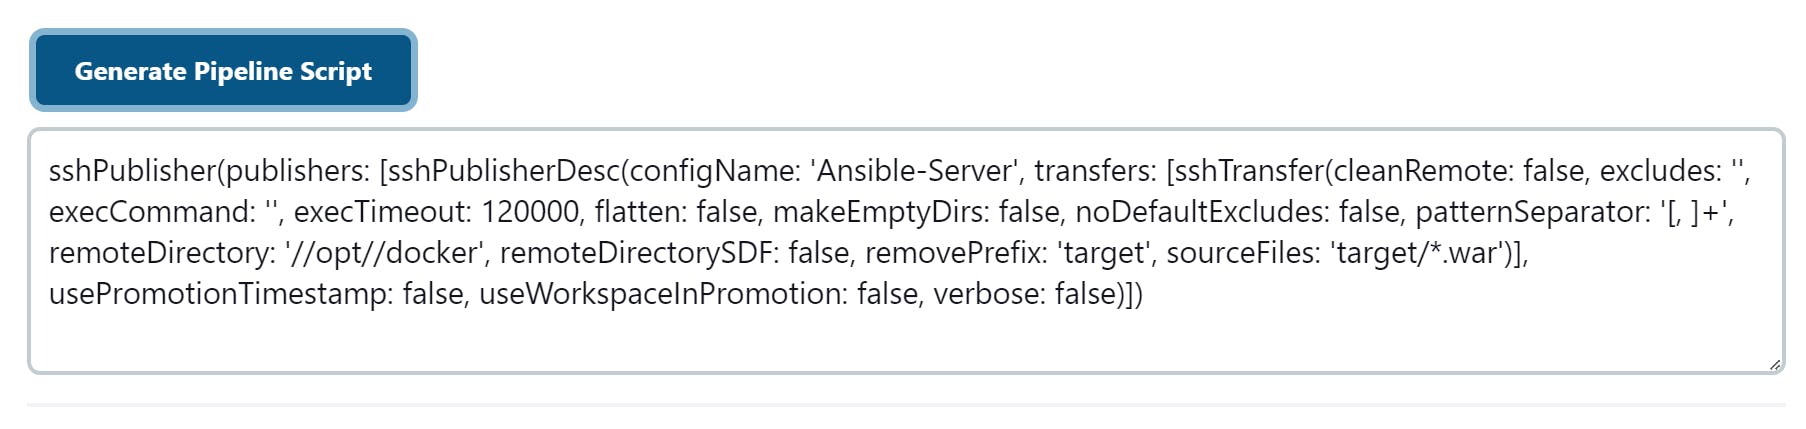
From the 'Sample Step' dropdown, select the 'sshPublisher' option. This option is available because you have installed the 'Publish Over SSH' plugin.

Once you select the 'sshPublisher' option, it will present you with the same options that are available when configuring the plugin for any project.
Provide the following options:
Name: Ansible-Server
Source files: target/*.war
Remove prefix: target
Remote directory: //opt/docker
After filling in all the necessary details, click on 'Generate Pipeline Syntax'. It will generate the necessary code that replicates the artifact transfer operation. You can then add this generated code as a step in any of the stages of your Jenkins pipeline.
By following this approach, you can replicate the functionality of any plugin and convert it into code, allowing for greater flexibility and customization in your pipeline configuration.
Upload to Docker Hub Stage
The artifact that was copied is residing in the /opt/docker directory on the Ansible server
The /opt/docker directory also contains a Dockerfile which will help us to create a docker image. After creating the image, it will get uploaded to Docker Hub.
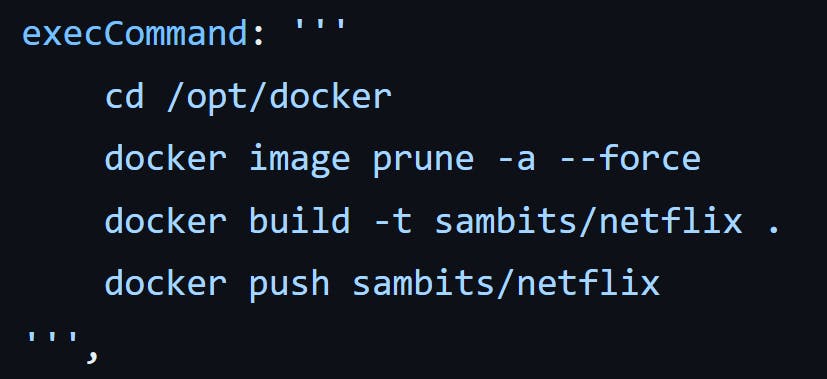
In the following commands, we navigate to the /opt/docker directory, which is the location of the artifact and Dockerfile. To ensure a clean build, any existing older images of the sambits/netflix repository are removed.
Next, we proceed to build a new Docker image using the Dockerfile present in the current working directory. The image is tagged with the repository name 'sambits/netflix'. If no specific tag is provided, the default tag 'latest' is assigned. The Docker build process compiles and packages the necessary dependencies and configurations into the image, ready for deployment.
Finally, the newly created Docker image is pushed to Docker Hub for further use and distribution. The image is accessible under the username 'sambits', with 'netflix' as the repository or image name. Pushing the image to Docker Hub enables easy sharing, deployment, and retrieval of the image by other users or systems.
Run Docker Container Stage
In this stage, we will pull the previously uploaded docker image from Docker Hub into the Docker server and start a container instance of it.
To achieve this, we will utilize Ansible to execute the necessary commands. Jenkins will instruct Ansible to trigger the execution of these commands. The following steps outline the process:

By changing to the /opt/playbooks directory, we ensure that we are in the correct location to run the Ansible playbook. The playbook (start_container.yaml) contains the necessary instructions to pull the Docker image and start a container with the application.
By executing the ansible-playbook command, we trigger Ansible to run the specified playbook, which will handle the deployment process and start the container with our application.
This stage effectively delegates the execution of commands to Ansible, while Jenkins coordinates the process and provides the necessary instructions.
Automate it
One way to do all the above processes is when developers upload their code to the git repository, a manual build is triggered through the Jenkins web UI. Another way is to trigger the build automatically as soon as there is any change in the git repository. This can be achieved by configuring the GitHub webhook for our project.
To configure this, follow these steps:
Select your project from the Jenkins Dashboard and click on 'Configure'. Under 'Build Triggers' check this option. This allows Jenkins to receive notifications whenever there is a change in the repository, such as a new commit or a pull request. 'Apply' and 'Save' the project.

Now, navigate to the GitHub repository page -> Go to Settings -> Click on 'Webhooks' from the left pane -> Click on 'Add webhook' -> In the 'Payload URL' provide the URL to access Jenkins and attach '/github-webhook/' to the end of the URL.
Set the 'Content type' to 'application/json' and leave everything as default and click on 'Add webhook'. After adding the webhook refresh the page to check the connection. If the connection was successful, it would look like this:

Jenkins is configured to listen for events from the repository using a GitHub webhook. Whenever there is a change (e.g., a commit, a new branch, a pull request) in the repository, GitHub sends a webhook notification to Jenkins. Jenkins receives the webhook and automatically triggers the build process for the associated project/job. The build process starts without any manual intervention.
To see the automated build process in action, make changes in the GitHub repository by editing the file located at 'src/main/webapp/index.html'. For example, in line 17 modify the price from 199 to 299 and commit the changes. Head back to the Jenkins web UI and wait for a build to start. Soon, you will notice that a new build is triggered automatically.

The build was successful.

The build process will follow the steps outlined earlier, including the deletion of the old container, the creation of a new image, and the deployment of a new container with the updated application.
To view the changes head to this URL: <public-ip-of-docker-server>:8090/webapp
The changes were reflected automatically.

By automating the build process with the help of a GitHub webhook, every time a change is made to the repository, Jenkins will automatically trigger the necessary steps, including the deletion of the old container, the creation of a new image, and the deployment of a new container. This ensures that the application is continuously updated with the latest changes without manual intervention.
Conclusion
In conclusion, this guide shows how to make a smooth CI/CD pipeline with Jenkins, Ansible, and Docker. These tools help you easily manage and deploy web apps on a Tomcat server in Docker containers. The guide explains how to set up the needed infrastructure on AWS, set up Jenkins and Ansible, make a Jenkins pipeline, create artifacts, make a Docker image, upload it to Docker Hub, and run commands to make a container instance. It also explains how to enable password authentication between Jenkins and Ansible, add a user to the Docker server set up Docker Hub, and log in to Docker Hub. Using a GitHub webhook with Jenkins makes the process even smoother, automatically starting the pipeline when changes are made to the repository.